Incompleteness Theorem and the Value of Programming Paradigms

Monday, August 12, 2013

Crisis of Mathematics Foundation


Recently, I am reading about computational mathematics and its history. One interesting topic is the crisis of mathematics' foundations in the early 1900s. This summary is my interpretation. In this episode, mathematician David Hilbert becomes worried that his field's foundations, proof by logic and axioms, is crumbling. Why does he think so? People have found paradoxes, unexplainable situations which arise by following his basic set of tools. This opens his field attack, to be called 'nothing more than useful tools', rather than 'essential truths of the universe'. Everyone wants to spend their time on subjects of importance, right?

So, if his field's basic tools, its axioms and theories, were complete and true, the mechanics of any one thing could be explained and calculated. However, simple paradoxes are found which his field can't explain. For example, the barber paradox is a logic puzzle which is an application of Russell's paradox, in set theory. Set theory mathematicians build theories which can explain the relationships between everything. If you ask a set theorist to explain the barber paradox, he will start to question whether his system's basic tools 'make sense'.

So you can see that if the usefulness of the basic tools of a mathematician's field are questioned as illogical, he will worry that he is spending his time building a useless system and search to extend his rules to cover this logical hole.

Perceived Crisis of Programming Tools


Does this story sound similar to you? I'm a computer programmer, and I often read blogs and such from other programmers. If you don't know, most programmer's discussion topics are "language X is better than language Y", or "tool X is better than tool Y". This is not bad, since a good programmer always asks "Can I do this better?". Of course he must listen when another programmer says "This way is better".

So, what's the answer? Which language is best? There is so much discussion on this topic, so someone surely has found an answer. Sadly, no. If you ask a rational and experienced programmer, he will have decided that "The right language depends on the problem you are solving".

Kurt Gödel's Logical Discovery


Back to the world of mathematics. Hilbert, like a good programmer, wanted to work with a perfect set of tools, a perfect set of axioms and theorems. What is a "perfect" set of axioms? It is a consistent and complete set, such that they can be composed to explain anything. So, Hilbert is asking for a single set of terms, a single language, to use for all mathematics. Is this possible?

To answer Hilbert, mathematician Kurt Gödel proved something interesting about mathematical logic. He showed that inherent limitation exist of any set of tools, that is, any system of axioms used for natural number arithmetic. In his incompleteness theorems, he proved that if you create a set of all consistent and true axioms, it can not explain all truths. That is, as a user of these axioms, there will always be statements which you know are true, but you can not prove them using your set of axioms.

(Side-note: This theorem has been referenced as an axiom to prove many things, from 'god exists and you need faith' to 'math and logic is useless'. However, I believe I am correct to say that these useages are incorrect because the logic in Gödel's theorem means the theorem can only be applied to systems of arithmetic and in the context of systematically generating a complete set of axioms.)

Judging Legitimacy of New Languages


How is this related to programming paradigms? Consider this extrapolation I made (possibly illogical, but still interesting) from Gödel's idea. Suppose: I have a statement which I know is true, but I can't prove it using our set of axioms. What to do? After looking closely, I see that I can slightly modify one of our axioms to create a new one, thereby enabling me to prove my statement. Can I do this? Is my new branch of math a legitimate one? I say yes; if it can be used to correctly describe the problem in a cleaner, more consistent way, then yes, its legitimacy is decided by its practicality and usefuless.

This story isn't wholly based in my imagination. Consider Hyperbolic geometry, which is a relatively new field of mathematics. It takes classical geometry, modifies a single axiom (changing the definition of parallel), and calls it a new kind of math. This new system of geometry is very practical, as it provides tools to solve previously-undescribable problems. Some of these problems are listed in this discussion.

Changing a Single Axiom in Programming Languages


How awesome. By changing a single basic assumption, a new way of thinking is developed to easily explain difficult things. In my opinion, this is exactly the criteria we should use to decide whether a new programming language should be used. A useful programming language should obey a single practical philosophy, that is, a single set of axioms.

For instance, consider Clojure. Traditional programming is based on manipulating variable values through a series of subroutines. Based on years of experience, the creator of Clojure decided that this idea of mutable state is really bad for modern applications, which is more and more using concurrently-running processes. Clojure restricts a programmer to immutable state, which theoretically makes writing programs using shared state safer and easier.

Another example is Erlang. Traditional programming is based on creating one executable program or process to run on a single machine. The practical world of software development created the notion of software services, such as web services, which should be always available. The creators of Erlang decided this idea is essential. By constructing their language around this core idea, they decided that pure functions and fault-tolerant processes are implied essences. By restricting a programmer to use only these ideas, Erlang programs theoretically have few concurrency-based bugs and very little downtime in production.

Final Thoughts


Difficult problems can become trivial problems if we change a single rule of the game. Applied to programming languages, I believe this requires more than adding a library to support this idea. Essential to injecting a new paradigm into a language is restricting the parts of the language which run contrary to the paradigm. John Carmack mentioned his recent research on functional programming languages in his recent talk at his QuakeCon 2013 keynote talk. He supports this idea of restricting a programmer when following a new paradigm:

    "Everything that is syntactically legal that the compiler will accept will eventually wind up in your codebase."

    "Languages talk about multi-paradigm as if it's a good thing, but multi-paradigm means you can always do the bad thing if you feel you really need to."

To liberally interpret his words, tool designers care about supporting a certain way of problem-solving, whereas programmers care about quickly and directly solving the problem at hand.

Build Your First Ruby on Rails App

Sunday, February 3, 2013

Foreword

I am interested in learning Ruby and its Rails website framework for two reasons:
1) To build quick websites.
2) Ruby seems like a useful tool.

This code article will simply be my notes from the Dreamforce 2013 developer session named "Hands-on Ruby on Rails - Build your First App". Here is its recording on YouTube that I'll be using, here are the slides on SlideShare, and here is the code artifacts on GitHub.


Session Agenda

  • Introduction to Ruby, Rails, and Heroku
  • Getting Started
  • Building a Blogging App
  • Deploying to Heroku
  • Q&A

Intro to Ruby and Rails

  • Ruby was created in 1995 by a Japanese guy known as Matz.
  • Ruby designed to be a cross-platform, simple scripting language.
  • Rails is a web app framework which uses MVC, which helps organize code.
  • Rails is designed to be simple by using fewer config files and good architectural patterns.
  • Rails uses routes, which means it is easy to make a RESTful web app.
  • Rails has a mantra - convention over configuration. One of those is directory structures:

    • app/controllers
    • app/helpers
    • app/mailers
    • app/models
    • app/views
    • config/
    • db/

Getting Started with Heroku

  • Heroku is nice and you should use it.

  • Install Rails Tools

    • Install Heroku Toolbelt (CLI, Foreman, Git) - (I previously had installed)
    • Install RVM, RubyGems, and also Homebrew if on Mac
    • Install Ruby 1.9.2 (I previously had installed)
    • Install Rails
    • Install PostgreSQL
    • Heroku Quickstart

Installing rvm

The speaker assumes the audience already had Rails installed. I do not, however, so I'll install that now. I'll be using the RailsApps install guide.

This guide recommends using rvm to manage Ruby and Rails versions. Why do we want rvm? It manages your app's libraries and frameworks which simplifies upgrading versions. First, rvm downloads and installs Ruby versions and gem versions into its repository which is in the ~/.rvm directory. Then, rvm sets all references to these, which is how your app finds them, such as the PATH.

  • Install rvm
      $ \curl -L https://get.rvm.io | bash -s stable --ruby
      

Quick rvm Tutorial

To specify and maintain the version of Ruby we want to use, specify the version like this. (Note: To see all Ruby versions that rvm supports, execute rvm list known.)

$ rvm 1.9.2-head

rvm enables you to create a 'gemset' to manage versions of dependencies, such as libraries or frameworks. Before upgrading to a new version of Rails, the guide recommends using rvm to create a gemset container in which to test it.

$ rvm gemset create rails222 rails126

With a gemset for the new Rails version, you can switch to that container and install Rails inside it.

$ rvm 1.9.2-head@rails222
$ gem install rails -v 2.2.2

$ rvm 1.9.2-head@rails126
$ gem install rails -v 1.2.6

Now that a gemset is defined for each version of the Rails gem, we can switch to each version of Rails like this.

$ rvm 1.9.2-head@rails222
$ rails --version   # Rails 2.2.2

$ rvm 1.9.2-head@rails126
$ rails --version   # Rails 1.2.6

Installing Rails

While we won't be using these advanced features of rvm, knowing the extent of this tool is still useful. We will be using just one feature of rvm, which is to install the latest Ruby version. If you didn't already do it, install the latest Ruby like this.

  • Install the Latest Ruby

    $ rvm 1.9.2-head
    

Now that we have the latest Ruby, we can continue following the Rails install guide here at the 'Install Rails 3.2.11' section.

The rvm package includes RubyGems, which is a package manager for Ruby. This tool makes it easy to use frameworks and libraries that exist in the Ruby ecosystem by centrally hosting various versions of registered packages or arbitrary code. We will use RubyGems to install the Rails package.

  • Install Rails

    $ gem install rails
    $ rails -v
    

I am using Ubuntu 12.04. Rails will attempt to use SQLite as a default database solution. Bundler will install the sqlite3 Ruby package, which is the Ruby interface code to the SQLite database software. If the SQLite software doesn't exist on the system, this Ruby package can't interface with it, and will cause an error. I haven't installed any database software yet, so generating a default Rails app will fail. To solve this, we need to install the sqllite3 database software using apt-get.

  • Install SQLite

    $ sudo apt-get install sqlite3 libsqlite3-dev
    

Using Rails

Rails is not only a web app framework, but it is also a code generator. Rails can generate a complex application that has many components. Because these components work together out of the box, your job as a web app dev is to customize the app, rather than spending lots of time gathering app components, connecting them together, and testing them.

So, let's tell Rails to generate a new app for us. It only requires us to name the app. Let's name it 'blog'.

$ rails new blog

This creates the directory structure for a web app and fills it with default HTML, CSS, and JS files. It also sets up the HTTP server and Ruby classes that handle HTTP requests. Most importantly, this generates our app's bundle file.

There are many libraries and third-party apps, such as an HTTP server, that compose our app. These dependencies are all collected into a single location, called a 'bundle' file. A tool called 'Bundler' reads this file to download and install these dependencies into our app for it to use.

One of these dependencies is a database solution.


Setting up Databases

Rails uses SQLite as its default database. This is a nice database because it's fast, which makes development more fun. However, because the production environment might require a heavier database, we might want to use two different databases - one for development and one for production. The PostgreSQL database has some really cool features, and Heroku likes this database, so I want to use it in production. Rails supports using multiple databases like this, so let's take a look.

Bundler installs our database software. We can ask Bundler to install SQLite if the environment is called 'development', and install PostgreSQL if it is called 'production'. Let's set up Bundler to do this.

  • Define different development and production databases

    • Open the gemfile file, which is located in the rails app's root directory.
    • Find the gem 'sqlite3' statement
    • Replace this line with the following

      group :production do
        gem "pg"
      end

      group :test do gem "sqlite3" end

Now, when this app is deployed to production and installed, Bundler will run, see that it's on production, and install PostgreSQL instead of SQLite to use. We can run Bundler on our app right now, in test mode, and I believe it will still download PostgreSQL, but not use it.

If we try to install this additional dependency now, it will fail because we haven't installed the PostgreSQL software to which this gem will attach. So let's install PostgreSQL.

  • Install PostgreSQL and header files for libraries

    $ sudo apt-get install postgresql-9.1
    $ sudo apt-get install libpq-dev
    

We can test this by running Bundler on our app again.

  • Install app dependencies with Bundler

    • Navigate to the Rails app's root directory.

      $ bundle install
      

Set up Data Model & Scaffolding

Our blog will be simple - its posts will have only a 'title' and a 'body'.

Adding a new database object to an application traditionally isn't as simple as clicking an 'Add' button. There are a few places to make this addition, namely in the database, in the persistence layer definitions, and Ruby classes to match the new object. These changes can be predictable for most use cases, so Rails can generate this code for us. In Rails, this stack of code for using and persisting an object in this manner is called a 'scaffold'. So, let's have Rails make this scaffold for us.

  • Make a new persistable object in Rails

    • Navigate to your app's root directory
    • Execute the following command to define and implement a new model named 'Post'

      $ rails generate scaffold Post title:string body:text
      

Note: You may have no problem, but I ran into an issue on Ubuntu. The result from running the command above is "Could not find a JavaScript runtime.", which I think is related to auto-compiling CoffeeScript. I really don't like installing Node.js just to allow Rails to auto-compile CoffeeScript, but this was my only way forward. A gem called therubyracer can be placed in the GemFile, which should fix this, but it didn't work for me. Maybe this issue is fixed in Rails 4. I'll check later. For now, let's manually add a JavaScript runtime, we must install Node.js. After installing this, run the command to generate the scaffold again.

  • Install Node.js

    $ sudo apt-get install nodejs
    

When the scaffold script is running, you can see it create some Ruby files, some Ruby HTML templates, and some CSS files. Let's feel lucky we didn't have to write that ourselves.


Customize Model's View Page

In customizing our app, we will spend majority of our time in a few places.

  • app/views/
  • app/controllers/
  • app/models/
  • config/

When a user navigates to our app using a web browser, they will be requesting files from our views directory. Each view will have dynamic data behind it, so a developer will be modifying the respective controller, which are in the controllers directory.

That's all we need to know about this for now.


Changing the Landing Page

The default landing page for out web app is a static page, specifically the public/index.html file.

One way we can customize the landing page is to define a dynamic route matcher. When a user enters a URL, something like mysite.com/posts/12345, the posts/12345 bit is called the route.

Your app may want to listen for these routes and respond when a pattern is matched. You can define such patterns in the config/routes.rb file. Let's add a route matcher for request for our app's root.

  • Add a route match for root

    • Open the config/routes.rb file
    • Add this line near the top

      root :to => "posts#index"
      
    • Save the file

Now, Rails will only use our routes mapping for a root request only if the public/index.html file doesn't exist. So, to activate our root mapping, we have to hide this file. Let's just change its name.

  • Hide the default root file

    • Rename the root file by executing this from the root directory

      $ mv public/index.html public/index.html.bak
      

When we start our app and navigate to the root page, we should see the index page for our posts.


Testing Our App Locally

Most of initializing and starting our app locally involves database preparation. We used Rails' scaffold command to add a Post object to our app. This command also added entries to our database management scripts, which is convenient. All we're left to do is run those scripts. Then, we can start our app server and test it with a web browser.

  • Create the database

    $ rake db:create
    
  • Run database migrations

    $ rake db:migrate
    
  • Start the app

    $ rails server
    

When you navigate to 0.0.0.0:3000 in your web browser, you should see a boring page that says "Listing posts" and has a "New Post" link.

Congrats! We have a working app!


Conclusion

After following the Rails walkthrough as organized by Chris Kemp, it seems like a pretty simple platform on which to create web apps. Do I dare say that it seems to be as simple as making Force.com apps?

Yes, figuring out what you need to start working on a Rails app and setting up your environment is a bit of work, but once prepared, customizing your app seems to be really straight-forward.

I'm curious how web apps manage user authentication and permissions, so I'll be looking into that next. It looks like Rails has good support for two authentication frameworks/libraries, called Devise and OmniAuth. I have no idea how these work, but the RailsApps group seems to have a good tutorial on creating a Rails app which uses Devise and Mongoid, so I'll be looking at this next.

Thanks for reading!

2012 Retrospective

Wednesday, January 2, 2013

Last Year's Accomplishments


One of my priorities in life is to keep improving and growing. So, to see my progress, motivate me, and give me self-confidence, I like to review my accomplishments from the last year, both big and small.

I'll list everything I'm proud of, in no order. Then I will choose a few significant ones to elaborate:

  • Spoke at a national software conference
  • Travelled to Vietnam and Taiwan
  • Fixed a falling garage door opener with my friend
  • Replaced the retaining wall for my home's egress window with my dad
  • Contributed to an open source software project
  • Significantly improved my JavaScript skills, which is still only the first few steps down that road
  • Learned more about my personality and moods
  • Set up a mini home server computer
  • Learned how to host a personal web server
  • Started learning how to use vim to edit text files for blog posts and what not
  • Dramatically improved my Chinese skills since really starting 12 months ago
  • Watched every episode of Star Trek to build my nerd-cred
  • Learned about early and middle history of Vietnam
  • Started learning about early history of China
  • Attained first rank (5-kyuu) in aikido after 6 months of training
  • Built better posture and self-confidence after lifting weights for 6 months
  • Improved straight-blade shaving skills by experimenting with variables of the art
  • Made home-made yogurt and bread. Failed attempt at brewing kombucha, but I learned from it
  • Bought many kinds of loose-leaf tea and became a fan of tea
  • Attended an anime convention with friends, which was an interesting experience
  • Was a member of the wedding party for a best college friend's wedding, which was an honor and humbling
  • Authored a programming article that was published on a major site

Spoke at National Conference


In the middle of summer last year I picked up an open source project that helps build HTML5 mobile apps on Salesforce to learn more about the practice. I believe I was the only one publicly making noise about the project by posting blog posts and tweets about it. The developer relations group in Salesforce announced a Call for Papers for Dreamforce 2012, which is the first year they included heavy support for both developers and the developer community at the huge conference. I thought I was qualified to talk about this open source project at Dreamforce, so I crafted an idea for a talk and an abstract to submit. A few weeks later, my talk was accepted. I was humbled for being chosen, excited for the opportunity, and scared of failure. I spent many hours in the next 2-3 months creating my talk, revising it, practicing it, and revising and practicing it more.

I finally found myself on the airplane to San Francisco. The night before my talk, I found myself in my hotel room practicing and still revising my talk. My talk was at noon on Wednesday, so I arrived at the conference hall an hour early to prepare my room. The conference employees told me that I must be in a room watching Salesforce's CEO give his keynote talk and ushered me into a room to watch it. His keynote talk was more than thirty minutes long, which meant that I was able to get into my room at 11:45am.

This proved to be not enough time since I found that my netbook was not compatible with the laptop presentation system in the room. I had to move my slide deck from my Linux laptop onto the Windows laptop which was provided with the room. I later found that several important images did not survive the file conversion to Windows' file format. I meant to create suspense before showing a slide with an image, but the audience laughed when I switched to blank slide and the suspense fell to the floor.

There was one other major issue with my presentation. My talk was about writing HTML5 applications, which are rendered in a browser. When I demonstrated how to use the software by opening the app in a browser, I was given a blank screen. Where was my app? I decided that the code must be wrong, and rather than debug the app, it would be best to continue. My second code demonstration fell to the same fate. What to do? Luckily, an audience member suggested I try a different browser. After spending a few empty minutes on stage loading my app into a new browser, I found it worked perfectly. Nice! This was hardly my fault, since I was forced to use a different laptop just minutes before starting my talk. An educational experience, to be sure.

In the end, it was a pretty great talk. At least five of the 150+ attendees stepped up after my talk to shake my hand and pay me compliments. One person later said that it was one of the most educational talks he attended at the four-day conference. How nice!

Visited Vietnam and Taiwan


From San Francisco, I skipped the last day of the conference and flew directly to Vietnam to attend a friend's wedding. I arrived on Saturday morning, and fought occasional punches of jet lag all day. The wedding was elaborate and I was humbled to be able to be there. I think is the most international wedding I will ever attend. The bride and grooms classmates from Japan, family from Vietnam and Scotland, and friends from even more countries were present to give their best wishes.

After the wedding, three of us travelled around Vietnam. One friend from Vietnam was an expert tour guide and served as a translator, a near-necessity when travelling to the smaller towns. With my other friend from Taiwan, the three of us saw remnants of the last war, climbed mountains, visiting a historic trading town, and saw dragons dancing for the autumn festival. And the food - the food was incredible. So many vegetables. Loved the variety.

After returning, I saw that my company had a two-day holiday for Thanksgiving, so I had to capitalize on the chance to take another extended vacation by spending a week in Taiwan to visit my friend there. Together, we again had the best vacation ever. We ate interesting food every day, climbed a mountain, saw the sun rise above the clouds, saw various sea creatures on a coral island, visited a town that was the site of the first trading settlement in the country. Awesome variety. We rode bullet trains, normal trains, subways, tour buses, city buses, taxis, and cars, not including the airplane home. My lust for adventure with friends was satisfied again. So awesome.

Build Some Muscle and Learned Some Aikido


I joined a gym and an aikido dojo in July last year, both at about the same time. After spending nearly two years building my software engineering knowledge, I felt a growing desire to build myself physically. I was a thin and kinda awkward guy, so I made a conscious decision to commit to building upper-body muscle and to learn a martial art. I visited a few different martial art dojos a year or two before, and I decided at that time that aikido was the best fit for me.

I'm proud to say that I was successful with both commitments. The first few months were very difficult, mostly because I started a strict diet while lifting heavy weights 4-5 times a week and also spending 4-5 days a week training aikido. I arrived home at 8pm every day completely physically exhausted. After stopping the strict food diet, I learned that the persistant lack of energy I experienced was caused by a lack of proper nutrition. I added fat and more calories into my diet, and my mood and energy quickly returned. It was an educational experience, to be sure.

Several times during this six months I was very close to quitting aikido. However, I chose to obey my commitment and I continued my training. The dojo follows a very traditional Japanese style. In our dojo, this means that there is a deep respect for older students and a deeper respect for dojo rules. This respect manifests in the form of ceremony and behavioral corrections by older students. I felt very restricted by the rules. I wanted to ask questions about how to perform a technique, but I was discouraged from doing so. Instead, I was told that aikido is something that your body learns by doing and explanations will not help. I also felt restricted from learning by experimenting. When I did experiment, I was told "You're doing it wrong. The technique is supposed to go like this". This was frustrating because everyone did the same technique differently and had different opinions, but I couldn't create my own flavor. It was a restrictive environment indeed.

After six months of training, however, I took my first test and attained the first for adults (5-kyuu). The test consisted of only 5 techiques, so I wasn't too worried about it. I practiced the same damned techniques so many times in the previous six months that I think I would go crazy if I was forced to practice them again. Despite my low expectations for satisfaction from the test, I surprised myself by how happy I was to pass. After the test, sensei said, "Alex", and I stood up. He said "Pass!" with the same serious and straight face he always had, and then gave his comments on my test. "That was some good stuff." This was the third time in six months that sensei ever directly addressed me. The last time he did so he asked me how old I was. His only response was a deep, dark laugh and then he moved on to train with another student.

I derived zero fun from my time at the aikido dojo. I actually disliked class. I didn't dislike the ceremony, but rather, it was the zero-explanation behavioral fixes from older students that I grew to dislike. I really didn't like operating in the dojo under the constant fear of breaking "the code". This refers to the proper code of conduct, which only a few older students knew. They grew to understand sensei's true wishes because they trained with him the longest and they have a special relationship with him. It's very much like a religion in which a priest claims he communicates with God. Because the priest is closest to God, you have no choice but to believe and obey what he says. This situation bothered me quite deeply, and I really questioned my long-term compatibility with the dojo.

Having said all this, studying aikido at the dojo was still a very educational experience. I learned a lot about commitment and about situations that don't agree with me. This will be a good point of reference for later in life, to be sure.

Focus for 2013


Having considered my progress in 2012, I would like to create areas of focus for my progress in 2013.

Last year, I made great progress in my career. I wanted to become an expert in my area, and I think I came close to attaining that. Am I satisfied with 2013 completely? No, not completely. One of my problems is that I push people away from me so that I can focus on satisfying my curiousity in software. However, I notice that one thing hasn't changed at all since last year: my friend count. While I have gained new friends in my career path, I haven't made new friends outside of work. Is this ok? I feel like I should diversify. Therefore, one of my areas of focus in 2013 is to spend less time learning about software and spending more time building friendships. This will be very challenging for me. I must recruit a friend to help me with this.

The second area of focus for me next year is to become even better at Chinese. I have made a lot of progress in the last year with my casual Chinese studies. I can recognize words when listening to songs, I can get a rough idea of a casual Chinese sentence on the Internet, I know many basic conversation words, and I have a pretty decent vocabulary about things I do. However, this opinion is all relative to my geographic location, which is Fargo, ND. If I want to get serious about learning Chinese, I would have to move to China. Anyways, I want to focus more on my Chinese studies next year.

This concludes my 2012 retrospective and 2013 goals. I'm all about encouragement in the right direction and setting attainable goals. I believe I've made my goals plenty general. Good luck to me and to you in 2013!

Creating a Public Web Server on Raspberry Pi

Sunday, November 18, 2012

Foreword


I bought a Raspberry Pi a few months ago with the intent to have a toy web server at home. It's cheap (~$30), low-power (~3W), and doesn't need a cooling fan, so it's the ideal toy server that I won't feel bad about running 24/7. It has an ARM processor instead of the more common x86 processor, so you can only install certain OSes on it. Windows, Mac OSX, or most distributions of GNU Linux are normally compiled to create binaries that execute on x86 processors, so these can't be used. The Linux kernel can be compiled to create ARM binaries, so certain Linux distributions are compatible with this small computer. The OS that was custom-made for this small computer is called Raspbian, which is what I am using, but you can also install other OSes, including Android, Fedora, and XBMC.

I don't have an HDMI computer display, nor an HDMI adapter, so I will be setting up my web server by sending terminal commands via SSH. Some people may be off-put by the terminal, but I'll try to stay organized so we don't get lost.

I spent a lot of time reading about the details of networking, remote administration, and web server setup and best practices. This project is certainly the entrance to a rabbit hole of other interesting details you don't normally think about on a daily basis. Even though I spent a terrible amount of time, I gained a great deal of satisfaction.

Prerequisites


I performed a bit of setup before starting this project, so you may need to:
  • Download and install the Raspbian OS onto an SD card
  • Play around a bit on the OS, read the provided introductory Linux documentation
  • Install some packages you like using apt-get, such as Git
  • Connect power to the Raspberry Pi and connect it to your home network
  • Connect your laptop via ethernet to same network as Raspberry Pi

Before we can begin, we must connect our Raspbery Pi to our network, as stated in the prerequisites.

Our first step is to ensure we can interface with our Raspberry Pi's OS. I will not be using a keyboard, mouse, or monitor directly connected to the device, instead I will be interfacing with it by sending terminal commands to it by using SSH. The device declares a default hostname of raspberrypi, which the local network can use to uniquely identify your device. This is very convenient because we don't have to find the IP address that the router assigned to it, we only have to request raspberrypi from the network to send it requests. If you want to change the device's hostname, there are ways to this.

  • Connect to your Raspberry Pi with SSH
    • From your laptop, open a terminal and enter ssh pi@raspberrypi, where pi is the name of the user account you want to use.
    • Enter your password, which is raspberry by default.
    • Your current directory is the pi user's home directory. Any subsequent commands will be executed on the Raspberry Pi.
    • Type exit to quit your SSH session.

Install a Web Server

There are a number of web server applications out there, such as Apache, Nginx, lighttpd, and Jetty. Apache is by far the most popular web server, so you may want to try that, but I'll be using Nginx because I like to feel unique. Actually, I can think of a good reason: Rumors say that Nginx has a small memory footprint. This is a good match for a low-memory computer like the Raspberry Pi.
  • Install the Nginx package from the default Raspbian repositories.

    • Just to verify we don't already have Nginx on this device, type which nginx into the SSH terminal. It should give us no result.
    • Update our apt-get sources by typing sudo apt-get update
    • Just to verify that Nginx is in the default repositories, type apt-cache search nginx. We should see several results, including the simply-named 'nginx' package.
    • Install the Nginx package by typing sudo apt-get install nginx.
  • Validate that Nginx is installed

    • Type service --status-all. We should see an entry called 'nginx'.

Web Server Security

We just set up an application on our computer that we intend to welcome requests from the rest of the internet, which can be quite dangerous, so let's add some security. Like a good parent, we need to tell our web server to not talk to strangers. Because this is one of my first web servers, I will refer to the web server security guide on Linode for all security advice, mostly because it seems to be well-written.

Because some people make their careers as penetration specialists, I have always been curious about server protection best practices. Some of the protection I will set up may be redundant in a home server situation, but it is never redundant if new knowledge is gained! If I'm missing some important steps, please tell me - I would love to know!

Secure User Accounts

My Raspberry Pi had a default user named 'pi' which I have been using. One concern with web servers is that if a hacker gains control of a web request process, it can run under the same user permissions as the process owner. I want to ensure that Nginx request handling processes be owned by a limited-permissions user.

Before that, we have one more important change: Change the default password of the default user. We will later expose this server's SSH port to the public internet, and an stranger on the internet might try a set of default username/passwords.
  • Change the default password of the default user
    • Open an SSH terminal into your Raspberry Pi
    • Type passwd pi to change the password for the device's default user account.
    • Enter the existing password, the new password twice, and hit enter to save the change.

Nginx is a master process that spawns worker processes to handle multiple web requests. The Apache community says that the 'www-data' user should handle web requests, so we'll do the same. While the Nginx master process runs as 'root' user, each worker process runs as the 'nobody' user by default. The worker process owner can be customized in the /etc/nginx/nginx.conf file.
  • Ensure web request processes run as limited-permission user

    • Open an SSH terminal into your Raspberry Pi
    • Enter the following command to check the Nginx default user: nano /etc/nginx/nginx.conf.
    • Ensure the first line of this configuration file is user www-data;.
  • Use SSH key pair authentication instead of passwords

    • On your laptop, open a terminal
    • Generate an SSH key pair by typing ssh-keygen

Set up a Firewall

We should also set up a firewall to protect our computer from port scanners and other malicious programs. A firewall is basically a set of rules that limits or blocks incoming or outgoing web requests. After a bit of research, it seems that a tool called iptables is the most popular solutions for this. It is also the solution proposed Linode's server security guide.

The Raspberry Pi firmware version that I have isn't compiled with iptables support, so you may have to upgrade your firmware first. Luckily, it was is simple as a few terminal commands if we use the rpi-update tool that a user named Hexxah has created.
  • Upgrade your Raspberry Pi's kernel
    • Open an SSH terminal into your Raspberry Pi.
    • Get the convenient upgrade script by running sudo wget http://goo.gl/1BOfJ -O /usr/bin/rpi-update && sudo chmod +x /usr/bin/rpi-update.
    • You may need the ca-certificates package to make a request to GitHub, so run this sudo apt-get install ca-certificates.
    • Finally, to upgrade your Raspberry Pi's firmware, run sudo rpi-update. This will take ~5 minutes.

Now that our Raspberry Pi has the iptables program, let's set it up.
  • Set up a firewall
    • Open an SSH terminal into your Raspberry Pi.
    • Check your default firewall rules by running sudo iptables -L.
    • Add firewall rules by creating a file by running sudo nano /etc/iptables.firewall.rules.
    • Copy and paste the basic rule set below into this file and save it:

/etc/iptables.firewall.rules

*filter

#  Allow all loopback (lo0) traffic and drop all traffic to 127/8 that doesn't use lo0
-A INPUT -i lo -j ACCEPT
-A INPUT -d 127.0.0.0/8 -j REJECT

#  Accept all established inbound connections
-A INPUT -m state --state ESTABLISHED,RELATED -j ACCEPT

#  Allow all outbound traffic - you can modify this to only allow certain traffic
-A OUTPUT -j ACCEPT

#  Allow HTTP and HTTPS connections from anywhere (the normal ports for websites and SSL).
-A INPUT -p tcp --dport 80 -j ACCEPT
-A INPUT -p tcp --dport 443 -j ACCEPT
-A INPUT -p tcp --dport 8080 -j ACCEPT

#  Allow SSH connections
#
#  The -dport number should be the same port number you set in sshd_config
#
-A INPUT -p tcp -m state --state NEW --dport 22 -j ACCEPT

#  Allow ping
-A INPUT -p icmp -j ACCEPT

#  Log iptables denied calls
-A INPUT -m limit --limit 5/min -j LOG --log-prefix "iptables denied: " --log-level 7

#  Drop all other inbound - default deny unless explicitly allowed policy
-A INPUT -j DROP
-A FORWARD -j DROP

COMMIT

  • Set up a firewall (continued)

    • Load the firewall rules by running sudo iptables-restore < /etc/iptables.firewall.rules.
    • Verify the rules have been loaded by running sudo iptables -L.
    • Now, to load these firewall rules every time the network adaptor is initialized, make a new file in the network adaptor hooks by running sudo nano /etc/network/if-pre-up.d/firewall.
    • Save the following text in this file:

      #!/bin/sh

      /sbin/iptables-restore < /etc/iptables.firewall.rules
    • Finally, make this script executable by running sudo chmod +x /etc/network/if-pre-up.d/firewall.

Defend Against Brute-force Attacks

One more thing we should be worried about is internet users attempting to access our SSH account by trying a dictionary attack against our password. There is a handy utility called Fail2Ban that monitors your log files for failed login attempts and temporarily blocks offending users.

  • Install and configure Fail2Ban
    • Install the Fail2Ban packages by running sudo apt-get install fail2ban.
    • You can do different customization, but I just followed the recommendations of these code snippets to add Nginx monitoring to Fail2Ban.

Secure SSH


I told my firewall to allow traffic through port 22, which is SSH. This means anybody, not only I, can try to SSH into my Raspberry Pi. To better secure this, we have already took two good steps: 1) changed the password for the default user, and 2) protect from brute-force attacks. But I want to do one more thing.

  • Restrict root for SSH
    • sudo vi /etc/ssh/sshd_config
    • Change the PermitRootLogin line like this:

      PermitRootLogin without-password

Update the Server's Software

A best practice for server admins is to ensure all server software is kept up-to-date. This is really easy in a Linux system like this, so there's no excuse. You should do this about once a month, or whenever you think of it.
  • Update all installed packages
    • Open an SSH session with your Raspberry Pi.
    • Update your index of available packages and versions by running sudo apt-get update.
    • Update your OS's installed softare by running sudo apt-get upgrade. This took ~10 min for me.


Request a Page from Your Private Web Server

Now that we have done our due diligence by securing our web server, let's start up Nginx.
  • Check the default Nginx config file by running sudo nano /etc/nginx/sites-enabled/default.
    • I am fine with the default setup. I just changed it to listen on port 8080.
  • Start the server
    • Open an SSH terminal and run this on the Raspberry Pi: sudo service nginx start.
  • Check the web server
    • The default static web directory is /usr/share/nginx/www/.
    • Open a browser on your laptop and navigate to raspberrypi in a web browser. You should see the default index.html file created by Nginx, which says something like "Welcome to Nginx!".

Request a Page from Your Public Web Server

The final hurdle is to make your Raspberry Pi accessible to the rest of the world. My router is not forwarding requests to the Raspberry Pi, so we will need to do some port forwarding. I added the DD-WRT firmware to my router quite a while ago, so you may need to find a more specific guide for adding port forwarding for your specific router.

Make Server Visible by Public IP Address

  • Navigate to your router by IP. I enter 192.168.1.1 into my browser.
  • Find the Port Forward settings
    • Add a new entry called rpi-web. FromPort=8080, ToPort=8080, IpAddress=(Raspberry Pi internal Ip)

Even with the port forwards, my web server still wasn't accessible by its public IP. With a friend's help, I tried putting it into my router's DMZ, which fixed the problem. It seems the purpose of a DMZ machine is to be the middle ground between your trusted/local network and the enemy/public network. This makes the DMZ machine almost wholly visible to the public internet. You may also want to try this on your router if you are having problems.
  • Put your server in your router's DMZ.
    • I have DD-WRT firmware on my router, so your steps may be different.
    • Open the web UI for your router by navigating to its IP address in a web browser.
    • Go to the NAT/QoS tab, then the DMZ tab.
    • Set Use DMZ field to Enable.
    • Set the internal IP of your web server in the DMZ Host IP Address field.

We now have our Raspberry Pi visible to the rest of the world on ports 80, 443, and 8080. Congratulations. Try sending a request to your web server by its public IP. You can find your public IP by using an internet site like IpChicken. If your external IP address is 123.45.67.890, then enter 123.45.67.890:8080 into your web browser to get the default Nginx index.html page.

Add Dynamic IP Solution: No-IP


My public IP address changes quite often, so it's impossible for me to SSH into my Raspberry Pi from work. To solve this, I wanted a domain name that points to my changing IP address. A technique called Dynamic DNS can help me. This involves registering a domain name with a third-party and periodically updating my server's registered IP address with a simple app. The third-party I chose to use is called No-IP. The No-IP updater app is built-in to some routers, so you should check there first. My router has this capability, which is filed under a category called DDNS, but it isn't working. So, I want to try installing the app on my Raspberry Pi. Let's give it a try.

  • Install the No-IP updater client

    • Download the package into a new directory and unarchive it

      mkdir ~/downloads
      wget http://www.no-ip.com/client/linux/noip-duc-linux.tar.gz
      tar vzxf noip-duc-linux.tar.gz
    • Compile the source code

      cd noip*
      sudo make
      sudo make install

During compilation, you will be prompted for your noip.com username and password, as well as a refresh interval (I chose 30)

Conclusion

That was quite an educational project. I have a new appreciation for managed web hosts, because I believe they are responsible for managing the server's security, network visibility, kernel upgrades, etc.

What's next? I want to set up other stuff on this little server, such as GitLab, RedMine, and TiddlyWiki.

Sunday Project: Force.com Spring App on Heroku

Saturday, November 10, 2012

Sunday Project: Force.com Spring app on Heroku


In this article, I will be using:
  • Ubuntu 12.04
  • Java 1.6 - OpenJDK Runtime/IcedTea6 1.11.5 (installed before, not sure of source)
  • Eclipse Indigo (installed before, not sure of source)
  • Eclipse Heroku Plugin 1.0.1
  • Git 1.7.9 or Eclipse eGit Plugin 1.3

I will be following this tutorial, which was presented at Dreamforce 2012. This training session was wonderfully presented by Anand B Narasimhan @anand_bn and Richard Vanhook @richardvanhook. I wanted to condense this 2+ hour session into just the steps required to make a Spring app on Heroku.

Update: I added the resulting code into a public repository on GitHub for your reference.

(Note: This article was my first attempt at using markdown as a formatting engine. I grabbed the HTML and pasted it into Blogger, then fixed some spacing. Markdown limits you to six choices for headings, bullet point and number lists, and horizontal rules, so it's kinda restrictive. At this time, I'm not sure how to format this article better, so any tips would be nice.)

What I learned, and what you may also gain from this article:
  • The Heroku Eclipse plugin greatly simplifies creating/developing Heroku apps.
  • Project templates are gold, and save hours of frustration and configuration.
    I have been horrified by the time required to go from an empty project to a working application in Java.
  • Embedded web container seems like a great idea. If system/environment admins don't have to set up the web server, there is less risk for failure when deploying to different environments. Moving one thing is so much easier than moving two things and ensuring they cooperate.
  • The project template uses a Java library called RichSobjects for talking to Salesforce. I haven't heard of this library before, but I'm making a mental note to check it out later if I need a Salesforce API library.


Prerequisites


  • Install the Eclipse Heroku Plugin
    • Official Heroku guide. But I will detail the steps here, also.
    • Link to the plugin binaries by going to Help > Install New Software and clicking Add.
    • Name = Heroku, Location = https://eclipse-plugin.herokuapp.com/install and follow prompts.
    • To set up the plugin, go to Window > Preferences and find the Heroku section on the left.
    • You will need a Heroku account, which is free. I made an account by using this wizard.
    • Get a Heroku API key by entering your Heroku credentials in the Email and Password fields and clicking Login.
    • The Heroku Plugin found my SSH key, because it is in a default location. If it's empty, follow the Heroku guide above to generate a public/private RSA key pair. Then return to the Heroku settings in Eclipse to generate an SSH key.


Create new Heroku app


  • Note: You can import an existing Heroku app by going to File > Import and selecting Heroku.
    However, I will be creating a new app through Heroku.
  • Tell Eclipse to set up a new Heroku project for you by going to File > New > Project...
    and select the Create Heroku App from Template.
  • Select Force.com connected Java app with Spring,OAuth and leave Application Name blank, as this name must be unique across all Heroku apps. If it's blank, Heroku will create a cool name for you.
    • This sends a request to Heroku to set up an app for you and puts all the code in a git repository that Heroku manages.
    • Eclipse will clone this Git repo locally and expose it as an Eclipse project.


Inspect what we have


  • This is a Maven project, so look at pom.xml to see dependencies:
    • Spring
      • spring-context
      • spring-webmvc
      • jstl
      • standard
      • javax.servlet-api
    • Salesforce
      • richsobjects-core
      • richsobjects-api-jersey-client
      • richsobjects-cache-memcached
      • force-oauth
      • force-springsecurity
    • Tomcat
      • webapp-runner
    • Logging
      • jcl-over-slf4j
      • slf4j-simple

There are many code files and settings files in this project, so it's hard to see what's going on. This is different from Force.com applications, in which only code is exposed to the developer, and settings are normally in the environment and changed in the UI. So, instead of looking at each component of this Java application, we are going to look at code at just the highest-level.

  • To see code that calls Force.com, see ContactController.java:
    • Class annotations (@Controller and @RequestMapping) are part of the Spring framework. These
      instruct the framework where to inject framework code at runtime. This keeps code clean.
    • This class uses the RichSobjects library to interact with Sobjects in a Salesforce database
      by using the Partner API.
  • To see the HTML page template we will request, see contacts.jsp:
    • Pretty simple: it's HTML which has JSP tags, which the HTTP request handler will resolve into HTML for the user.
  • To see global variables for the Spring app, see applicationContext.xml:
    • Most values are hard-coded in this file. However, look at lines 29-33 to see yet-unresolved values. These values will be drawn from the Heroku environment, I believe.

      <fss:oauth logout-url="/logout" default-logout-success="/">
          <fss:oauthInfo endpoint="http://login.salesforce.com"
                         oauth-key="#{systemEnvironment['SFDC_OAUTH_CLIENT_ID']}"
                         oauth-secret="#{systemEnvironment['SFDC_OAUTH_CLIENT_SECRET']}"/>
      </fss:oauth>
      
  • Where is Tomcat?
    • Heroku uses idea of an embedded web container. Instead of running a web deamon as an OS process, and the Java app as a separate OS process, we unify the two pieces. We can instantiate the Tomcat web server from our Java program, using a Java wrapper called webapp-runner.
    • webapp-runner makes app deployment and app start very simple.
    • Jetty is another web server that is popular to use as an embedded server.
  • How to start our app?
    • Procfile has a command that Heroku can call to starts an application.
      • web java $JAVA_OPTS -jar target/dependency/webapp-runner.jar --port $PORT target/*.war
      • (process name) (command to execute)
    • Can have multiple processes - e.g. web, worker, and clock
  • Navigate to app on Heroku
    • Find the name of your app, which we allowed Heroku to decide. If it was funny-name-1234,
      navigate to this URL to see that the app is already running on Heroku:
      • funny-name-1234.herokuapp.com

Set up local build for OAuth


This application is currently set up to use OAuth to gain access to data in a Salesforce org. By default, Salesforce will not allow OAuth applications to request access, so we have to add an exception, that is, define an accessible application.

  • To allow an external application to request access to a Salesforce org:
    • Login in to the Salesforce org to which you want to connect.
    • To allow an external application access, go to Setup > Develop > Remote Access.
      • Click New.
      • Choose any name in the Application field for this record. I chose Heroku Local.
      • Choose any email for Contact Email field.
      • Use http://localhost:8080/_auth for the Callback URL field.
      • Click Save.
    • Navigate to the detail view of this Remote Access record to see that Salesforce
      generated a Consumer Key and a Consumer Secret.
  • To set up our project to run locally in Eclipse, instead of only on Heroku:
    • Set up a Run configuration by going to Run > Run Configurations...
    • Select Java Application from the list on the left and click the plus icon at the top of this list.
    • Choose a name for this Run configuration. I chose 'web app runner'.
    • Enter your project name in the Project field, which looks like funny-name-1234.
    • Choose the main class for the Main Class field, which is webapp.runner.launch.Main for this project.
    • Go to the Arguments tab, and enter src/main/webapp in the Program Arguments field.
    • This application uses environment variables for OAuth. We will specify this at run-time by going to the Environment tab. This app is expecting two keys, "SFDC_OAUTH_CLIENT_ID", and "SFDC_OAUTH_CLIENT_SECRET".
      • Click New.
      • Name = SFDC_OAUTH_CLIENT_ID
      • Value = (value of Consumer Key field from Remote Access record we just created)
      • Save this and click New.
      • Name = SFDC_OAUTH_CLIENT_SECRET
      • Value = (value of Consumer Secret field from Remote Access record we just created)
      • Save this.
    • Click Run.


After performing these steps and pressing Run, the application should be running locally on port 8080.
We can see this by navigating to the http://localhost:8080 URL in a web browser. To check that our OAuth has been set up correctly, navigate to http://localhost:8080/sfdc/Contacts URL. The app will redirect to a Salesforce authentication page, where you should click Allow. You will then be redirected back to the same URL in your authentication.


Setup Heroku app for OAuth


We added run-time variables to our environment by adding them to the Run Configuration in Eclipse.
To add these variables to our app when it is running on Heroku, we must add them to another settings
location in Eclipse that gets pushed to Heroku.


  • Add another Remote Access record to the Salesforce org:
    • Login in to the Salesforce org to which you want to connect.
    • To allow an external application access, go to Setup > Develop > Remote Access.
      • Click New.
      • Choose any name in the Application field for this record. I used the name of
        Heroku app, Heroku Funny Name.
      • Choose any email for Contact Email field.
      • Use https://funny-name-1234.herokuapp.com/_auth for the Callback URL field.
      • Click Save.
    • Navigate to the detail view of this Remote Access record to see that Salesforce
      generated a Consumer Key and a Consumer Secret.
  • Open the Heroku settings for this Heroku project:
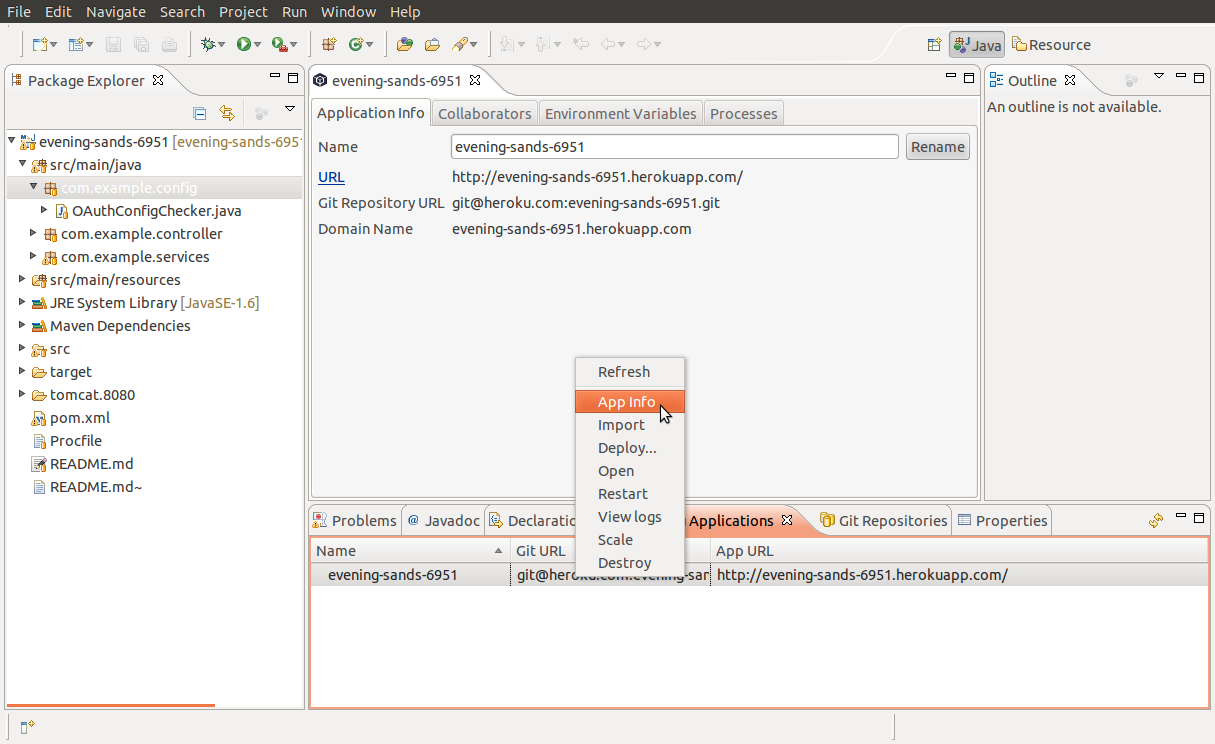
    • In Eclipse, click Window > Show View > Other...
    • Choose My Heroku Applications.
    • Right-click on your application in this view, and select App Info.
    • To add new environment variables to this Heroku app, choose the Environment Variables tab
      from this file.
      • Click the + button on the right.
      • Key = SFDC_OAUTH_CLIENT_ID
      • Value = (value of Consumer Key field from Remote Access record we just created)
      • Save this and click New.
      • Key = SFDC_OAUTH_CLIENT_SECRET
      • Value = (value of Consumer Secret field from Remote Access record we just created)
    • After adding these environment variables, the Heroku app should be immediately updated to
      reflect the values. If you navigate to the Contacts URL of your Heroku app,
      funny-name-1234.herokuapp.com/sfdc/Contacts, you can see that the OAuth is now working.

Add New Feature to Your App


To show how to add a new feature to the app, we will be adding a link to each contact's Twitter
handle. Follow these steps to add this new feature.


  • 1) Add a new custom field to the Contact object:
    • Login to the same Salesforce org.
    • Go to Setup > Customize > Contacts > Fields. Click New and create a new text field
      called TwitterHandle__c.
    • Save this.
  • 2) Query this field in our local copy of the Java project:
    • In Eclipse, open ContactsController.java.
    • In the listContacts method, add TwitterHandle__c to the Select clause of the query.
    • Save this file.
  • 3) Expose this field value in the JSP page:
    • In Eclipse, open contacts.jsp.
    • Add a new header column to this table by adding <th>Twitter Handle</th> to line 13,
      underneath the Email header.
    • Expose the field value in the table cells by adding <td>${contact.getField("TwitterHandle__c").value}</td>
      to line 27, underneath the similar row for Email.
    • Save this file.
  • 4) Test this change in the local build of the project:
    • Stop the server by opening the Console view in Eclipse and clicking the red stop button.
    • Run a new build, which will have our Twitter handle column in the Contacts page by clicking
      the Run button underneath the toolbar, which looks like a green arrow.
    • Navigate to the URL for this local page, which should be http://localhost:8080/sfdc/contacts.
  • 5) To commit these changes locally:
    • Right-click on your project in the Package Explorer in Eclipse, select Team > Commit.
    • Add a commit message which describes the changes, and click Commit.
  • 6) To push these local changes to our Heroku repository:
    • Right-click on your project in the Package Explorer in Eclipse, select Team > Push to Upstream.

Managing Your App


  • Check status of app
    • Go to My Heroku Applications view in Eclipse.
    • Right-click on one of your apps, and click View Logs to see last 1500 log lines
      for your app in production.
    • Heroku made a thing called "Logplex". All messages that your app produces can
      be accessed here. You can find third-party apps to derive information from these logs.
  • Scale your app up and down
    • Free dev accounts have only one dyno.
    • To scale app to >1 dynos, must tie money to account, for example, by joining
      app to Heroku org with money.
    • Right-click on one of your apps in My Heroku Applications, click Scale and choose 3.
      Your app is now on a 3-node, load-balanced cluster.
  • Add collaborators
    • Go to My Heroku Applications in Eclipse and click App Info.
    • Go to the Collaborators tab to see all other users in your Heroku organization.
    • Either select one of these users or click the plus button on the right to add by email.


Starting to Understand Inheritance

Saturday, May 19, 2012

Software Inheritance

As a software engineer, as you spend more time in the profession, you will continually see software structured differently from how you would do it. Sometimes, you are just confused by the author's code, other times you understand and disagree with it, and yet other times you become so inspired by it that adopt its design. Recently, I've come across object-oriented code that makes heavy use of inheritance in its solution, and I have been actively confused by it due to its difficult reading level. I think I am finally coming to understand how to read code written in the inheritance style, and I'd like to share what I've found.

Initial Issues - Internal State

When first encountering inheritance, I interpreted it on a shallow level. I saw the 'extends' keyword, which means it 'inherits' from the specified class and can reference its variables and methods, but I never understood how its utilization could justify the higher maintenance cost of its slurred readability.

The first issue I had with reading inheritance-based code is sharing class properties. When I create a new class, I design it to minimize references to internal state. I use static methods as much as possible. Why? Those class properties are variables, unless they use 'final' keyword, and without foresight for possible values of these class properties, your methods can produce unexpected results.

So consider my surprise to see references to a base class' internal properties from an inheriting class! What could the author be thinking? Are you really sure you trust that that class-external variable will always be a valid value for your class? Holy buckets, Batman, this inheritance business seems to be a bucket of holes!

Towards Better Understanding

I was reading some Javascript code recently for an Ajax-y framework. The base of the app uses John Resig's simple Javascript inheritance, and subsequent objects extend from this base Class type. It seemed that the author was so influenced by inheritance that he wanted to force it into Javascript before considering his solution. I understood inheritance on a shallow level, but still - what is so necessary about inheritance?

After some research, I think I'm starting to understand the case for inheritance. The explanation offered on this Wikipedia page on Differential Inheritance was quite inspirational.
"To think of differential inheritance, you think in terms of what is different. So for instance, when trying to describe to someone how Dumbo looks, you could tell them in terms of elephants: Think of an elephant. Now Dumbo is a lot shorter, has big ears, no tusks, a little pink bow and can fly. Using this method, you don't need to go on and on about what makes up an elephant, you only need to describe the differences; anything not explicitly different can be safely assumed to be the same." - Wikipedia: Differential Inheritance
Ah, from this point of view, inheritance is a convenient way of saying "I need a class just like that one, but a little different." In other words, it is a programmer's feature for convenient customization. A bonus feature is that the inheriting class can be used in place of the base class by using type casting. (Short thought - isn't this ability better performed by using interfaces and a platform that accepting registering custom handlers?)

Issue Still Remains

While I do have a better understanding of inheritance now, my problem still exists: If MyClass inherits from BaseClass, I can't look at MyClass on its own because most of the real logic exists in BaseClass! This doesn't help when debugging these two classes, since BaseClass was designed to run one way, and MyClass might be changing the behavior of BaseClass in an incompatible manner. Sure, this may work, but it feels a bit fragile and unnecessary. I wonder if my understanding of the benefits of inheritance-utilizing code will grow as I continue to read it, but I hope it isn't a poison that infects my style.

On Recording Growth - Studying vs Building

Sunday, April 15, 2012

My career choice is a software engineer, a knowledge-based career. While it is easy to show a product for the time I spend writing software, it isn't so easy for time studying it. With studied knowledge, I may be able to hold more intelligent discussions about software engineering, but if I disappear tomorrow, will my time investment in reading about it have any lasting impact on the world around me? No - all that knowledge is locked inside my head. This is where blogging can be so important, and why I value it.

From Studying to Building

I haven't been blogging much lately, which doesn't please me. Why haven't I been blogging? When I was regularly blogging, the process was composed of spending time studying software topics, then transferring my realizations into blog posts. A month or two ago, I started writing a software tool to help develop and deploy Force.com code, and I stopped studying software topics. I haven't completed a useful piece of software before, not including the one-off solutions I write for my job, and I wanted to test my abilities to see if I am able to actually write something useful on my own. As I continued with the project, I found my abilities to be lacking, which surprised and angered me.

And so my obsession was triggered. If I can't write a simple little software tool like this, can I really call myself a skilled software engineer? I think I can't. A simple tool like this shouldn't be so difficult, and yet I can't finish it or reach a useful state! When I'm not banging my head against my laptop screen in frustration when hacking on this code, I'm thinking about how the failed project trumpets my ineptitude. Since starting, it has consumed most of my free evenings, and my obsession with this code leaves me unable to study the higher aspects of software engineering, leaving me with no material for my blog. If only I can finish this program, I will have evidence that I can write useful software, and I will be able to forget the huge time investment I made.

Expectations of Studying vs Building

Stepping back to see this, I find myself at a crossroads, deciding which road to choose in the future. Should I be a higher-level software engineer, concerned with small steps of enlightenment that are easily serialized into blog posts, or should I be a software hacker, who gains skills writing real software but has difficulty serializing gained knowledge in blog posts?

Or am I drawing another false dichotomy? Probably so. So how is studying different from building, such that I feel like time can be wasted in one but not the other? The time spent building a program that can't be finished and can't be used - is is time wasted? It sure feels like wasted time when you don't reach your expectations and feel like a failure. Contrast this with pure study; When you study something, you are searching for answers to questions, rarely committed enough to feel failure. So perhaps this is the only difference between the two - expectations.

This will be the conclusion from today's introspection. Either study or building is a valid way to grow, learn, and improve, but building may have the ability to cause deeper emotions.

On Moving to Legacy Java Web App Maintenance

Thursday, March 1, 2012

I work in a company with other developers. Whether we are on the same project or not, we are on the same team and we need to support each other. Since I started working at Sundog ~14 months ago, I've working solely with Salesforce, doing custom Force.com development. I've gotten pretty accustomed to the limits and boundaries of the platform, and I feel that I'm pretty good with it.

A coworker has been maintaining a rather large legacy Java web application by himself for the last >2 years. It's been decided that its time to shift another developer into his position, and that person shall be me. He was getting pretty sick of being the lone developer on old code. As he has been setting up my environment and training me in over the last week, I can almost see the weights as they are lowered from his shoulders. He's a great software engineer who has been trapped by misfortune for a long time, so I'm happy to step in so he can move onto something else.

As a company, we have been pretty poor about shifting teams. Some people grew so tired of being the only person who can something, and they have left the company because of it. These employees are called knowledge silos, and this is inherently a bad thing. If only one employee knows how to manage an important system, or only one employee can use a certain software tool, the company will be screwed when that employee leaves. It would take months before they can find another person with a similar skill-set, and even longer for that person to catch up to where his predecessor left off.

So yes, I'll be using Java, and re-learning how to program since I haven't used it in a long time. I've learned how to set up a local web application server, OC4J, and how painful they are to boot, configure, and manage. I've learned how to set up and use a 'real, enterprise' IDE, IntelliJ, to edit, deploy, and debug Java projects. I still need to learn a whole new set of keyboard shortcuts and IDE quirks. I will continue to learn about OS-level frameworks, specifically, Struts and Spring, and their models of handling HTTP requests. I will study up on OOP design patterns, and I will have to review the advanced language features that are available to use in Java (I'm familiar with Salesforce's Apex, which is Java Lite).

I have mixed feelings about this change in positions for me. I am happy to learn about different MVC frameworks and how a real debugger works (I haven't hardcore used one before). However, I am truly worried that I will be doing Java maintenance for the foreseeable future (RE: >1 year). I really don't want to be off by myself again, separated from the forward direction that the company is taking into cloud and mobile platforms. I am really worried that doing pure maintenance like this for a full year will destroy my passion and motivation for software engineering, design, and language theory. Here's to hoping I can keep my chin up. ( ̄ω ̄')

Salesforce Painful Certification Practices - No Feedback

Wednesday, February 22, 2012

This post is an open complaint towards Salesforce's certification process. This is quite a long post, and you may thing that it is a rant. Well, it very well may be a rant, but these are opinions that must be expressed, and I will gladly take the podium at this time because I haven't heard anyone else complain. I need to discuss a few of Salesforce's terrible certification practices: inconsistent terminology and poor feedback.

The first area of fault that I want to point out is Salesforce's inconsistent terminology. I'm sure you know what I mean if you've studied for or taken any certification exams. I've taken a few Salesforce certification multiple choice exams, the Developer Certification and the Advanced Developer Certification exam. Both of these multiple choice exams were filled with questions that were trickily worded and had choices that were equally as tricky worded. Rather than testing the candidates knowledge and understanding of concepts, these exams seemed to be testing the candidates ability to remember key Salesforce terminology. Salesforce often uses multiple words to describe the same thing, and uses the same words to describe other things as well, and on top of this, they are inconsistent with the usage of this terminology. To test candidates on this inconsistent terminology is a terrible practice.

To move onto the main complaint of this post, I want to discuss Salesforce's feedback on their certification exams. In short, there is none. If you fail an exam, you are not told how close you were to passing, nor were you told in what areas you did poorly. This is key information! It encourages more studying for the next time, and it provides a foothold for that candidate to use to attempt to pass the test next time. Without feedback, taking these tests is like running full speed into a wall. The wall either busts and you pass through, or you fall flat on your backside. You may start to feel insane after feeling the pain of failure three times in a row.

To continue on this point, I want to extend this complaint from written exams to hand-graded exams. If you fail a multiple choice exam, you will certainly remember some of the questions from the exam. Some may intrigue or confuse you and inspire you to research and remember them later. But consider the case of submitting a programming assignment for human review, or giving a presentation before a panel of judges, which are situations one will encounter when attempting Advanced Developer or Salesforce Architect certification. I've failed the Advanced Developer Certification programming assignment once before now, and they did provide feedback to me. However, this feedback seemed to have been computer-generated or mistaken, because when I read the feedback, I have no idea about what part of my code they are marking as a mistake. Moreover, their feedback does not help me to improve!

To provide specific details about the poor feedback Salesforce provides, I'll provide a few excerpts from my last programming assignment results.

"The design approach taken is suboptimal and does not demonstrate an understanding of triggers, order of execution, and platform design principles on the platform." - I'm sorry, but I believe that I am a very pragmatic programmer and that I am *very* familiar with the Salesforce platform. When I read this, I think back on much of the example code I read in Salesforce documentation, and how inefficient and poor they are. So these same Salesforce experts think that my code is very poor? I care a great deal about writing maintainable and efficient code! If they think my code is terrible, point out my mistakes! I would love to fix them and improve the code I write on your platform! Seriously! what code are they looking at?

"Areas for Improvement: Use of aggregate queries" - I am well aware of SOQL's aggregate query functionality, but I found not a single place in the application where it makes sense to use aggregate queries. If they told me that I as required to use an aggregate query, just to demonstrate my knowledge of them, instead of using a single query to get the records I need and looping over them, I could have easily added a second (precious) query just to use an aggregate. I didn't even consider this, however, since Salesforce's governor limits force developers to minimize the number of SOQL queries.

"Areas for Improvement: Conforming to governor limits" - Uh... what? What actionable item or lesson learned can I take away from this? Every single one of my methods were "bulkified", and accept only collections as parameters! What code are YOU looking at!

"Strengths: Developing scalable code to handle bulk operations" - What! You just told me that my code is inefficient and doesn't conform to governor limits! Now you tell me that my code is wonderfully scalable?

In this final paragraph, I want to give a voice to the feedback process of the Salesforce Architect certification. My co-worker, not I, took this exam, so I'm reporting second-hand information. He paid thousands of dollars and took time off of work to fly to San Francisco to give a presentation before a panel of judges. They gave him a book of backstory and requirements for integrating an external system with Salesforce and allowed ~60 minutes to architect his solution and prepare his solution for presentation. 60 minutes is hardly a practical amount of time to solidly architect a thing of that scale! To add insult to injury, when he received the results via email the following week, which informed him of his failure, they provided no explanation, justification, or areas of improvement. How can he prepare to take this exam again the next time? How can he justify spending thousands of dollars again and not be able to promise improved odds of success? It is quite hard to justify attempting this exam again, no matter how important it is.


For consulting companies like my own, certifications are a necessary way to prove to new and existing clients that we legitimately understand the technology. Therefore, to improve our position relative to competitors, we strongly encouraging our employees to obtain as many Salesforce certifications as possible. I don't mind getting certified, because it makes me a more employable person, and I also personally want to be awesome at my profession. So, even though a certification process is incredible painful, people like me will be forced to continue banging our heads into walls.

How to Implement my Theoretical UpdateContentRequest

Friday, February 10, 2012

Continuation from previous post. It was written on a caffeine high, so I thought I was saving the world, and this post would be the roadmap to salvation.

Alright, problem: the user clicked the "next" button/link, now our Javascript app needs to load new content.
Link the button to a Javascript function called UpdateContentRequest. What does this function do? We want this function to do everything necessary to update the page to show this new content. This requires a few steps.
First, it has to request the new content from the server. This isn't too difficult if we use jQuery's snack function. A more flexible solution is to make the content available via a REST interface and use a Javascript REST framework. What do we do after we get it? We can either store it locally, either in a variable or in the HTML5 LocalStore. The other option is to immediately render it to the page without storing it long-term.

This brings us to the next step. Once we have the data, how do we render it to the page easily and appropriately? This also shouldn't be too difficult if we use the right tools. It's easy to know where to place this new data using Javascript if we use an id attribute to mark the parent element of the content - call it "blogContentWrapper" or something. The other tool to use is a Javascript templating language. There are many of these out there, such as jQuery templates, handlebars, or mustache, so just pick your favorite. These tools allow you to write an HTML template with a few holes, then inject data into this template to dynamically produce the marked-up content. Just take this marked-up content and replace the current child of the "blogContentWrapper" with it.

Wow, this sounds so easy. The hard part is to make this library flexible so it can be used for a number of types of websites while keeping it easy to use and powerful. I'll need to consider the use cases for this library and then reconsider the level of abstraction to use. Also, Google supports crawling Ajax websites like this, so I'll need to consider their requirements to keep this library compatible.

The Appeal of Single Page Web Apps

Single page web apps. I am very happy when I visit a site that subscribes to this philosophy because they at very responsive. A philosophy? Yes, I think it is a philosophy. Can we call it a philosophy if its followers advocate it as a way to avoid wastefulness? While single page web sites are a wonderful solution when creating a few types of web sites, it isn't the best choice for others types. Ignore that while we discuss the wastefulness that single page web sites solve.

Website wastefulness? What waste, exactly? What I am thinking about is the site's entire HTML markup, Javascript, and CSS styling must be resent to the browser for each request. Sure, client-side browser caching may help reduce the wasteful resource requests here, but we shouldn't depend on the client to optimize this when the website developer has the power to optimize the user's experience.

How can the website developer optimize this? Make the web site a Javascript app! Send this Javascript app on the initial page load, then delegate each subsequent page request to the Javascript app. How will the Javascript app do this? It will request just the new content from the server and place it on the page. Using this method, we are only grabbing the new content that the user wants, not all the resources and markup for the page. Efficient! And fast!

I haven't figured out how to architect this Javascript framework, but I'm sure it would be worth the time investment. Maybe there is an existing framework that does most of this, or even some of it.

Two Months of Chinese Language - Stories of Its Usefulness

Saturday, January 28, 2012


In my last post, I explained my recent shift in priorities, which resulted in one of my hobbies, Chinese language learning, moving to number one position. I spent ~2 months studying Chinese in preparation for my vacation to Taiwan by myself, to test myself by seeing how much of a language one can learn in two months.

How did I score on my self-test? Not as good as I hoped, but still successful. While I was only able to understand a few words of each sentence, I wasn't able to grasp much meaning. I *was* successful in communicating on a few occasions. I was city-walking, trying to find the hiking path to the top of a large hill. I stopped a guy walking on the street with a "dui bu qi" (excuse me) and explained that "wo xiang qu zhe li" (I want to go here) and pointed to my map. Success! He spoke some fast Chinese that I didn't understand, but he also used hand motions! Straight ahead and left! Alright! I found the mountain, but got couldn't find the hiking trail to go up.

I saw another bored-looking guy, so I asked him "wo xiang qu shang" (I want to go up). I hoped my language didn't sound like a caveman with such simple sentences. I guess my tones were right, because he didn't look offended as if I had insulted his mother. He also used hand motions! Success!

I spent some time in Japan, and made a good friend who is from central Taiwan. I took the opportunity to meet up with her again, and I spent a few days with her family. Her family was very welcoming toward me. They had a car! This was so nice to see after city-walking in Taipei for 5 days. They took me to a few of their favorite restaurants. Real chinese food is not street food? Trip-changing experience! Home-made food is what? Noodles, rice, and veggies! So interesting! They drove me to a mountain where some of the best Oolong tea is made. How educational! I didn't know Oolong tea could be so delicious! And I didn't know what tea fields look like. Rows of bushes on hillsides in the clouds! Beautiful, educational!

I felt so bad about not being able to make fulfilling meal-time conversation. I wish I could have told them what my life was like, and what I found interesting about their lives. I wish I could have thanked them in better Chinese. I hope my gestures and thoughts of thanks were picked up by their sense of empathy. If I say "xie xie" (thank you) five times in a row, does that properly mean "Thanks! I owe you so much, and your home and family is so awesome! I had so much fun!"? I sure hope they got the message.

The one part of the language that I totally failed at? Ordering food. At most of the restaurants I visited in Taiwan, there are no pictures of food you can use to decide what to order. There's a sheet of paper with a grid on it. One column of the grid is filled with Chinese words for foods. The other column is for you to place checkmarks. This is broken up into categories. So, if McDonald's used this concept (they totally should), to order a burger, you need to take a sheet of paper, and put a checkmark next to 'hamburger', 'cheese', 'pickles', 'bacon', and 'lettuce', and don't forget to put a checkmark next to 'fries'. This is a very efficient way to order, I think, but if you can read *none* of the words, you just put checkmarks next random words that you like - Maybe a word has a simple letter or it's one that you recognize. More than once, I was surprised by what I got, and I still have no idea how to order it again. I need to learn more food words next time I travel to Taiwan or China.

Priority Change - Chinese Studies Promoted

Most of 2011 has seen me diligently studying the art of software development. It's a very deep topic that could keep me occupied for the rest of my life. I'm lucky to be able to work and stay interested in such a deep discipline. I've developed a few other interested in the second half of 2011, one of which is the Chinese language. A recent development has caused me to push my Chinese studies up to number one, ahead of software studies. This means that I won't be blogging about software for awhile. :( This kind of saddens me because I enjoy software, and investing time in it will help me out in my career as well. But, as with investments, it is smart to diversify. If the software industry dries up (can't imagine why) or my life changes drastically and I lose interest in it, my trump card will be useless. So onwards to investing time in hobbies.

Why Chinese? Why *not* Chinese? I've learned that you shouldn't have to justify your interests; it is an indescribable force that captures ones interests and it should be trusted.

Well, maybe I can find a small influence for the development of this interest. I had been building up vacation days, so I had to start thinking about what to do with them. While it would be nice in the short term, spending a week in a tropical paradise didn't suit me. I needed something that I could explore and learn about. After much thought, I decided on two ways to use my vacation time most effectively: a) Travel to a fun city that also has a software conference to attend, or b) Learn a new language and travel to a place that speaks it as a test for myself.

Which did I choose? Well, if I can decide on a good conference to go to, my company would pay for me to attend it - no need to spend my vacation time. So I decided to test myself. I bought a round trip ticket to Taiwan, scheduled for 2 months in the future, and attempted to learn as much Chinese as I could in two months.

How much Chinese did I learn before departing? I was pretty motivated during those two months. I may write another blog post detailing my strategy, which proved to be pretty effect, but I can summarize it here. I listened to many hours of basic Chinese phrases in situations. I had to listen to each lesson ~5 times before I was able to pick up any words. Separately, I started doing flashcards. It is pretty easy to find flashcards for all the basic Chinese, such as 'Thank you", "Goodbye", "This is delicious", and "Where's the bathroom". I tried to learn ~20 new words each day (probably more in reality). I think I had completed a deck of 500 words before leaving, and crammed another 200 on the flight to Taiwan (it was a long flight).

Read part two of this post here, where I tell stories about the few times that my Chinese studies paid off.