Showing posts with label Software Development. Show all posts

Build Your First Ruby on Rails App

Sunday, February 3, 2013

Foreword

I am interested in learning Ruby and its Rails website framework for two reasons:
1) To build quick websites.
2) Ruby seems like a useful tool.

This code article will simply be my notes from the Dreamforce 2013 developer session named "Hands-on Ruby on Rails - Build your First App". Here is its recording on YouTube that I'll be using, here are the slides on SlideShare, and here is the code artifacts on GitHub.


Session Agenda

  • Introduction to Ruby, Rails, and Heroku
  • Getting Started
  • Building a Blogging App
  • Deploying to Heroku
  • Q&A

Intro to Ruby and Rails

  • Ruby was created in 1995 by a Japanese guy known as Matz.
  • Ruby designed to be a cross-platform, simple scripting language.
  • Rails is a web app framework which uses MVC, which helps organize code.
  • Rails is designed to be simple by using fewer config files and good architectural patterns.
  • Rails uses routes, which means it is easy to make a RESTful web app.
  • Rails has a mantra - convention over configuration. One of those is directory structures:

    • app/controllers
    • app/helpers
    • app/mailers
    • app/models
    • app/views
    • config/
    • db/

Getting Started with Heroku

  • Heroku is nice and you should use it.

  • Install Rails Tools

    • Install Heroku Toolbelt (CLI, Foreman, Git) - (I previously had installed)
    • Install RVM, RubyGems, and also Homebrew if on Mac
    • Install Ruby 1.9.2 (I previously had installed)
    • Install Rails
    • Install PostgreSQL
    • Heroku Quickstart

Installing rvm

The speaker assumes the audience already had Rails installed. I do not, however, so I'll install that now. I'll be using the RailsApps install guide.

This guide recommends using rvm to manage Ruby and Rails versions. Why do we want rvm? It manages your app's libraries and frameworks which simplifies upgrading versions. First, rvm downloads and installs Ruby versions and gem versions into its repository which is in the ~/.rvm directory. Then, rvm sets all references to these, which is how your app finds them, such as the PATH.

  • Install rvm
      $ \curl -L https://get.rvm.io | bash -s stable --ruby
      

Quick rvm Tutorial

To specify and maintain the version of Ruby we want to use, specify the version like this. (Note: To see all Ruby versions that rvm supports, execute rvm list known.)

$ rvm 1.9.2-head

rvm enables you to create a 'gemset' to manage versions of dependencies, such as libraries or frameworks. Before upgrading to a new version of Rails, the guide recommends using rvm to create a gemset container in which to test it.

$ rvm gemset create rails222 rails126

With a gemset for the new Rails version, you can switch to that container and install Rails inside it.

$ rvm 1.9.2-head@rails222
$ gem install rails -v 2.2.2

$ rvm 1.9.2-head@rails126
$ gem install rails -v 1.2.6

Now that a gemset is defined for each version of the Rails gem, we can switch to each version of Rails like this.

$ rvm 1.9.2-head@rails222
$ rails --version   # Rails 2.2.2

$ rvm 1.9.2-head@rails126
$ rails --version   # Rails 1.2.6

Installing Rails

While we won't be using these advanced features of rvm, knowing the extent of this tool is still useful. We will be using just one feature of rvm, which is to install the latest Ruby version. If you didn't already do it, install the latest Ruby like this.

  • Install the Latest Ruby

    $ rvm 1.9.2-head
    

Now that we have the latest Ruby, we can continue following the Rails install guide here at the 'Install Rails 3.2.11' section.

The rvm package includes RubyGems, which is a package manager for Ruby. This tool makes it easy to use frameworks and libraries that exist in the Ruby ecosystem by centrally hosting various versions of registered packages or arbitrary code. We will use RubyGems to install the Rails package.

  • Install Rails

    $ gem install rails
    $ rails -v
    

I am using Ubuntu 12.04. Rails will attempt to use SQLite as a default database solution. Bundler will install the sqlite3 Ruby package, which is the Ruby interface code to the SQLite database software. If the SQLite software doesn't exist on the system, this Ruby package can't interface with it, and will cause an error. I haven't installed any database software yet, so generating a default Rails app will fail. To solve this, we need to install the sqllite3 database software using apt-get.

  • Install SQLite

    $ sudo apt-get install sqlite3 libsqlite3-dev
    

Using Rails

Rails is not only a web app framework, but it is also a code generator. Rails can generate a complex application that has many components. Because these components work together out of the box, your job as a web app dev is to customize the app, rather than spending lots of time gathering app components, connecting them together, and testing them.

So, let's tell Rails to generate a new app for us. It only requires us to name the app. Let's name it 'blog'.

$ rails new blog

This creates the directory structure for a web app and fills it with default HTML, CSS, and JS files. It also sets up the HTTP server and Ruby classes that handle HTTP requests. Most importantly, this generates our app's bundle file.

There are many libraries and third-party apps, such as an HTTP server, that compose our app. These dependencies are all collected into a single location, called a 'bundle' file. A tool called 'Bundler' reads this file to download and install these dependencies into our app for it to use.

One of these dependencies is a database solution.


Setting up Databases

Rails uses SQLite as its default database. This is a nice database because it's fast, which makes development more fun. However, because the production environment might require a heavier database, we might want to use two different databases - one for development and one for production. The PostgreSQL database has some really cool features, and Heroku likes this database, so I want to use it in production. Rails supports using multiple databases like this, so let's take a look.

Bundler installs our database software. We can ask Bundler to install SQLite if the environment is called 'development', and install PostgreSQL if it is called 'production'. Let's set up Bundler to do this.

  • Define different development and production databases

    • Open the gemfile file, which is located in the rails app's root directory.
    • Find the gem 'sqlite3' statement
    • Replace this line with the following

      group :production do
        gem "pg"
      end

      group :test do gem "sqlite3" end

Now, when this app is deployed to production and installed, Bundler will run, see that it's on production, and install PostgreSQL instead of SQLite to use. We can run Bundler on our app right now, in test mode, and I believe it will still download PostgreSQL, but not use it.

If we try to install this additional dependency now, it will fail because we haven't installed the PostgreSQL software to which this gem will attach. So let's install PostgreSQL.

  • Install PostgreSQL and header files for libraries

    $ sudo apt-get install postgresql-9.1
    $ sudo apt-get install libpq-dev
    

We can test this by running Bundler on our app again.

  • Install app dependencies with Bundler

    • Navigate to the Rails app's root directory.

      $ bundle install
      

Set up Data Model & Scaffolding

Our blog will be simple - its posts will have only a 'title' and a 'body'.

Adding a new database object to an application traditionally isn't as simple as clicking an 'Add' button. There are a few places to make this addition, namely in the database, in the persistence layer definitions, and Ruby classes to match the new object. These changes can be predictable for most use cases, so Rails can generate this code for us. In Rails, this stack of code for using and persisting an object in this manner is called a 'scaffold'. So, let's have Rails make this scaffold for us.

  • Make a new persistable object in Rails

    • Navigate to your app's root directory
    • Execute the following command to define and implement a new model named 'Post'

      $ rails generate scaffold Post title:string body:text
      

Note: You may have no problem, but I ran into an issue on Ubuntu. The result from running the command above is "Could not find a JavaScript runtime.", which I think is related to auto-compiling CoffeeScript. I really don't like installing Node.js just to allow Rails to auto-compile CoffeeScript, but this was my only way forward. A gem called therubyracer can be placed in the GemFile, which should fix this, but it didn't work for me. Maybe this issue is fixed in Rails 4. I'll check later. For now, let's manually add a JavaScript runtime, we must install Node.js. After installing this, run the command to generate the scaffold again.

  • Install Node.js

    $ sudo apt-get install nodejs
    

When the scaffold script is running, you can see it create some Ruby files, some Ruby HTML templates, and some CSS files. Let's feel lucky we didn't have to write that ourselves.


Customize Model's View Page

In customizing our app, we will spend majority of our time in a few places.

  • app/views/
  • app/controllers/
  • app/models/
  • config/

When a user navigates to our app using a web browser, they will be requesting files from our views directory. Each view will have dynamic data behind it, so a developer will be modifying the respective controller, which are in the controllers directory.

That's all we need to know about this for now.


Changing the Landing Page

The default landing page for out web app is a static page, specifically the public/index.html file.

One way we can customize the landing page is to define a dynamic route matcher. When a user enters a URL, something like mysite.com/posts/12345, the posts/12345 bit is called the route.

Your app may want to listen for these routes and respond when a pattern is matched. You can define such patterns in the config/routes.rb file. Let's add a route matcher for request for our app's root.

  • Add a route match for root

    • Open the config/routes.rb file
    • Add this line near the top

      root :to => "posts#index"
      
    • Save the file

Now, Rails will only use our routes mapping for a root request only if the public/index.html file doesn't exist. So, to activate our root mapping, we have to hide this file. Let's just change its name.

  • Hide the default root file

    • Rename the root file by executing this from the root directory

      $ mv public/index.html public/index.html.bak
      

When we start our app and navigate to the root page, we should see the index page for our posts.


Testing Our App Locally

Most of initializing and starting our app locally involves database preparation. We used Rails' scaffold command to add a Post object to our app. This command also added entries to our database management scripts, which is convenient. All we're left to do is run those scripts. Then, we can start our app server and test it with a web browser.

  • Create the database

    $ rake db:create
    
  • Run database migrations

    $ rake db:migrate
    
  • Start the app

    $ rails server
    

When you navigate to 0.0.0.0:3000 in your web browser, you should see a boring page that says "Listing posts" and has a "New Post" link.

Congrats! We have a working app!


Conclusion

After following the Rails walkthrough as organized by Chris Kemp, it seems like a pretty simple platform on which to create web apps. Do I dare say that it seems to be as simple as making Force.com apps?

Yes, figuring out what you need to start working on a Rails app and setting up your environment is a bit of work, but once prepared, customizing your app seems to be really straight-forward.

I'm curious how web apps manage user authentication and permissions, so I'll be looking into that next. It looks like Rails has good support for two authentication frameworks/libraries, called Devise and OmniAuth. I have no idea how these work, but the RailsApps group seems to have a good tutorial on creating a Rails app which uses Devise and Mongoid, so I'll be looking at this next.

Thanks for reading!

Creating a Public Web Server on Raspberry Pi

Sunday, November 18, 2012

Foreword


I bought a Raspberry Pi a few months ago with the intent to have a toy web server at home. It's cheap (~$30), low-power (~3W), and doesn't need a cooling fan, so it's the ideal toy server that I won't feel bad about running 24/7. It has an ARM processor instead of the more common x86 processor, so you can only install certain OSes on it. Windows, Mac OSX, or most distributions of GNU Linux are normally compiled to create binaries that execute on x86 processors, so these can't be used. The Linux kernel can be compiled to create ARM binaries, so certain Linux distributions are compatible with this small computer. The OS that was custom-made for this small computer is called Raspbian, which is what I am using, but you can also install other OSes, including Android, Fedora, and XBMC.

I don't have an HDMI computer display, nor an HDMI adapter, so I will be setting up my web server by sending terminal commands via SSH. Some people may be off-put by the terminal, but I'll try to stay organized so we don't get lost.

I spent a lot of time reading about the details of networking, remote administration, and web server setup and best practices. This project is certainly the entrance to a rabbit hole of other interesting details you don't normally think about on a daily basis. Even though I spent a terrible amount of time, I gained a great deal of satisfaction.

Prerequisites


I performed a bit of setup before starting this project, so you may need to:
  • Download and install the Raspbian OS onto an SD card
  • Play around a bit on the OS, read the provided introductory Linux documentation
  • Install some packages you like using apt-get, such as Git
  • Connect power to the Raspberry Pi and connect it to your home network
  • Connect your laptop via ethernet to same network as Raspberry Pi

Before we can begin, we must connect our Raspbery Pi to our network, as stated in the prerequisites.

Our first step is to ensure we can interface with our Raspberry Pi's OS. I will not be using a keyboard, mouse, or monitor directly connected to the device, instead I will be interfacing with it by sending terminal commands to it by using SSH. The device declares a default hostname of raspberrypi, which the local network can use to uniquely identify your device. This is very convenient because we don't have to find the IP address that the router assigned to it, we only have to request raspberrypi from the network to send it requests. If you want to change the device's hostname, there are ways to this.

  • Connect to your Raspberry Pi with SSH
    • From your laptop, open a terminal and enter ssh pi@raspberrypi, where pi is the name of the user account you want to use.
    • Enter your password, which is raspberry by default.
    • Your current directory is the pi user's home directory. Any subsequent commands will be executed on the Raspberry Pi.
    • Type exit to quit your SSH session.

Install a Web Server

There are a number of web server applications out there, such as Apache, Nginx, lighttpd, and Jetty. Apache is by far the most popular web server, so you may want to try that, but I'll be using Nginx because I like to feel unique. Actually, I can think of a good reason: Rumors say that Nginx has a small memory footprint. This is a good match for a low-memory computer like the Raspberry Pi.
  • Install the Nginx package from the default Raspbian repositories.

    • Just to verify we don't already have Nginx on this device, type which nginx into the SSH terminal. It should give us no result.
    • Update our apt-get sources by typing sudo apt-get update
    • Just to verify that Nginx is in the default repositories, type apt-cache search nginx. We should see several results, including the simply-named 'nginx' package.
    • Install the Nginx package by typing sudo apt-get install nginx.
  • Validate that Nginx is installed

    • Type service --status-all. We should see an entry called 'nginx'.

Web Server Security

We just set up an application on our computer that we intend to welcome requests from the rest of the internet, which can be quite dangerous, so let's add some security. Like a good parent, we need to tell our web server to not talk to strangers. Because this is one of my first web servers, I will refer to the web server security guide on Linode for all security advice, mostly because it seems to be well-written.

Because some people make their careers as penetration specialists, I have always been curious about server protection best practices. Some of the protection I will set up may be redundant in a home server situation, but it is never redundant if new knowledge is gained! If I'm missing some important steps, please tell me - I would love to know!

Secure User Accounts

My Raspberry Pi had a default user named 'pi' which I have been using. One concern with web servers is that if a hacker gains control of a web request process, it can run under the same user permissions as the process owner. I want to ensure that Nginx request handling processes be owned by a limited-permissions user.

Before that, we have one more important change: Change the default password of the default user. We will later expose this server's SSH port to the public internet, and an stranger on the internet might try a set of default username/passwords.
  • Change the default password of the default user
    • Open an SSH terminal into your Raspberry Pi
    • Type passwd pi to change the password for the device's default user account.
    • Enter the existing password, the new password twice, and hit enter to save the change.

Nginx is a master process that spawns worker processes to handle multiple web requests. The Apache community says that the 'www-data' user should handle web requests, so we'll do the same. While the Nginx master process runs as 'root' user, each worker process runs as the 'nobody' user by default. The worker process owner can be customized in the /etc/nginx/nginx.conf file.
  • Ensure web request processes run as limited-permission user

    • Open an SSH terminal into your Raspberry Pi
    • Enter the following command to check the Nginx default user: nano /etc/nginx/nginx.conf.
    • Ensure the first line of this configuration file is user www-data;.
  • Use SSH key pair authentication instead of passwords

    • On your laptop, open a terminal
    • Generate an SSH key pair by typing ssh-keygen

Set up a Firewall

We should also set up a firewall to protect our computer from port scanners and other malicious programs. A firewall is basically a set of rules that limits or blocks incoming or outgoing web requests. After a bit of research, it seems that a tool called iptables is the most popular solutions for this. It is also the solution proposed Linode's server security guide.

The Raspberry Pi firmware version that I have isn't compiled with iptables support, so you may have to upgrade your firmware first. Luckily, it was is simple as a few terminal commands if we use the rpi-update tool that a user named Hexxah has created.
  • Upgrade your Raspberry Pi's kernel
    • Open an SSH terminal into your Raspberry Pi.
    • Get the convenient upgrade script by running sudo wget http://goo.gl/1BOfJ -O /usr/bin/rpi-update && sudo chmod +x /usr/bin/rpi-update.
    • You may need the ca-certificates package to make a request to GitHub, so run this sudo apt-get install ca-certificates.
    • Finally, to upgrade your Raspberry Pi's firmware, run sudo rpi-update. This will take ~5 minutes.

Now that our Raspberry Pi has the iptables program, let's set it up.
  • Set up a firewall
    • Open an SSH terminal into your Raspberry Pi.
    • Check your default firewall rules by running sudo iptables -L.
    • Add firewall rules by creating a file by running sudo nano /etc/iptables.firewall.rules.
    • Copy and paste the basic rule set below into this file and save it:

/etc/iptables.firewall.rules

*filter

#  Allow all loopback (lo0) traffic and drop all traffic to 127/8 that doesn't use lo0
-A INPUT -i lo -j ACCEPT
-A INPUT -d 127.0.0.0/8 -j REJECT

#  Accept all established inbound connections
-A INPUT -m state --state ESTABLISHED,RELATED -j ACCEPT

#  Allow all outbound traffic - you can modify this to only allow certain traffic
-A OUTPUT -j ACCEPT

#  Allow HTTP and HTTPS connections from anywhere (the normal ports for websites and SSL).
-A INPUT -p tcp --dport 80 -j ACCEPT
-A INPUT -p tcp --dport 443 -j ACCEPT
-A INPUT -p tcp --dport 8080 -j ACCEPT

#  Allow SSH connections
#
#  The -dport number should be the same port number you set in sshd_config
#
-A INPUT -p tcp -m state --state NEW --dport 22 -j ACCEPT

#  Allow ping
-A INPUT -p icmp -j ACCEPT

#  Log iptables denied calls
-A INPUT -m limit --limit 5/min -j LOG --log-prefix "iptables denied: " --log-level 7

#  Drop all other inbound - default deny unless explicitly allowed policy
-A INPUT -j DROP
-A FORWARD -j DROP

COMMIT

  • Set up a firewall (continued)

    • Load the firewall rules by running sudo iptables-restore < /etc/iptables.firewall.rules.
    • Verify the rules have been loaded by running sudo iptables -L.
    • Now, to load these firewall rules every time the network adaptor is initialized, make a new file in the network adaptor hooks by running sudo nano /etc/network/if-pre-up.d/firewall.
    • Save the following text in this file:

      #!/bin/sh

      /sbin/iptables-restore < /etc/iptables.firewall.rules
    • Finally, make this script executable by running sudo chmod +x /etc/network/if-pre-up.d/firewall.

Defend Against Brute-force Attacks

One more thing we should be worried about is internet users attempting to access our SSH account by trying a dictionary attack against our password. There is a handy utility called Fail2Ban that monitors your log files for failed login attempts and temporarily blocks offending users.

  • Install and configure Fail2Ban
    • Install the Fail2Ban packages by running sudo apt-get install fail2ban.
    • You can do different customization, but I just followed the recommendations of these code snippets to add Nginx monitoring to Fail2Ban.

Secure SSH


I told my firewall to allow traffic through port 22, which is SSH. This means anybody, not only I, can try to SSH into my Raspberry Pi. To better secure this, we have already took two good steps: 1) changed the password for the default user, and 2) protect from brute-force attacks. But I want to do one more thing.

  • Restrict root for SSH
    • sudo vi /etc/ssh/sshd_config
    • Change the PermitRootLogin line like this:

      PermitRootLogin without-password

Update the Server's Software

A best practice for server admins is to ensure all server software is kept up-to-date. This is really easy in a Linux system like this, so there's no excuse. You should do this about once a month, or whenever you think of it.
  • Update all installed packages
    • Open an SSH session with your Raspberry Pi.
    • Update your index of available packages and versions by running sudo apt-get update.
    • Update your OS's installed softare by running sudo apt-get upgrade. This took ~10 min for me.


Request a Page from Your Private Web Server

Now that we have done our due diligence by securing our web server, let's start up Nginx.
  • Check the default Nginx config file by running sudo nano /etc/nginx/sites-enabled/default.
    • I am fine with the default setup. I just changed it to listen on port 8080.
  • Start the server
    • Open an SSH terminal and run this on the Raspberry Pi: sudo service nginx start.
  • Check the web server
    • The default static web directory is /usr/share/nginx/www/.
    • Open a browser on your laptop and navigate to raspberrypi in a web browser. You should see the default index.html file created by Nginx, which says something like "Welcome to Nginx!".

Request a Page from Your Public Web Server

The final hurdle is to make your Raspberry Pi accessible to the rest of the world. My router is not forwarding requests to the Raspberry Pi, so we will need to do some port forwarding. I added the DD-WRT firmware to my router quite a while ago, so you may need to find a more specific guide for adding port forwarding for your specific router.

Make Server Visible by Public IP Address

  • Navigate to your router by IP. I enter 192.168.1.1 into my browser.
  • Find the Port Forward settings
    • Add a new entry called rpi-web. FromPort=8080, ToPort=8080, IpAddress=(Raspberry Pi internal Ip)

Even with the port forwards, my web server still wasn't accessible by its public IP. With a friend's help, I tried putting it into my router's DMZ, which fixed the problem. It seems the purpose of a DMZ machine is to be the middle ground between your trusted/local network and the enemy/public network. This makes the DMZ machine almost wholly visible to the public internet. You may also want to try this on your router if you are having problems.
  • Put your server in your router's DMZ.
    • I have DD-WRT firmware on my router, so your steps may be different.
    • Open the web UI for your router by navigating to its IP address in a web browser.
    • Go to the NAT/QoS tab, then the DMZ tab.
    • Set Use DMZ field to Enable.
    • Set the internal IP of your web server in the DMZ Host IP Address field.

We now have our Raspberry Pi visible to the rest of the world on ports 80, 443, and 8080. Congratulations. Try sending a request to your web server by its public IP. You can find your public IP by using an internet site like IpChicken. If your external IP address is 123.45.67.890, then enter 123.45.67.890:8080 into your web browser to get the default Nginx index.html page.

Add Dynamic IP Solution: No-IP


My public IP address changes quite often, so it's impossible for me to SSH into my Raspberry Pi from work. To solve this, I wanted a domain name that points to my changing IP address. A technique called Dynamic DNS can help me. This involves registering a domain name with a third-party and periodically updating my server's registered IP address with a simple app. The third-party I chose to use is called No-IP. The No-IP updater app is built-in to some routers, so you should check there first. My router has this capability, which is filed under a category called DDNS, but it isn't working. So, I want to try installing the app on my Raspberry Pi. Let's give it a try.

  • Install the No-IP updater client

    • Download the package into a new directory and unarchive it

      mkdir ~/downloads
      wget http://www.no-ip.com/client/linux/noip-duc-linux.tar.gz
      tar vzxf noip-duc-linux.tar.gz
    • Compile the source code

      cd noip*
      sudo make
      sudo make install

During compilation, you will be prompted for your noip.com username and password, as well as a refresh interval (I chose 30)

Conclusion

That was quite an educational project. I have a new appreciation for managed web hosts, because I believe they are responsible for managing the server's security, network visibility, kernel upgrades, etc.

What's next? I want to set up other stuff on this little server, such as GitLab, RedMine, and TiddlyWiki.

Sunday Project: Force.com Spring App on Heroku

Saturday, November 10, 2012

Sunday Project: Force.com Spring app on Heroku


In this article, I will be using:
  • Ubuntu 12.04
  • Java 1.6 - OpenJDK Runtime/IcedTea6 1.11.5 (installed before, not sure of source)
  • Eclipse Indigo (installed before, not sure of source)
  • Eclipse Heroku Plugin 1.0.1
  • Git 1.7.9 or Eclipse eGit Plugin 1.3

I will be following this tutorial, which was presented at Dreamforce 2012. This training session was wonderfully presented by Anand B Narasimhan @anand_bn and Richard Vanhook @richardvanhook. I wanted to condense this 2+ hour session into just the steps required to make a Spring app on Heroku.

Update: I added the resulting code into a public repository on GitHub for your reference.

(Note: This article was my first attempt at using markdown as a formatting engine. I grabbed the HTML and pasted it into Blogger, then fixed some spacing. Markdown limits you to six choices for headings, bullet point and number lists, and horizontal rules, so it's kinda restrictive. At this time, I'm not sure how to format this article better, so any tips would be nice.)

What I learned, and what you may also gain from this article:
  • The Heroku Eclipse plugin greatly simplifies creating/developing Heroku apps.
  • Project templates are gold, and save hours of frustration and configuration.
    I have been horrified by the time required to go from an empty project to a working application in Java.
  • Embedded web container seems like a great idea. If system/environment admins don't have to set up the web server, there is less risk for failure when deploying to different environments. Moving one thing is so much easier than moving two things and ensuring they cooperate.
  • The project template uses a Java library called RichSobjects for talking to Salesforce. I haven't heard of this library before, but I'm making a mental note to check it out later if I need a Salesforce API library.


Prerequisites


  • Install the Eclipse Heroku Plugin
    • Official Heroku guide. But I will detail the steps here, also.
    • Link to the plugin binaries by going to Help > Install New Software and clicking Add.
    • Name = Heroku, Location = https://eclipse-plugin.herokuapp.com/install and follow prompts.
    • To set up the plugin, go to Window > Preferences and find the Heroku section on the left.
    • You will need a Heroku account, which is free. I made an account by using this wizard.
    • Get a Heroku API key by entering your Heroku credentials in the Email and Password fields and clicking Login.
    • The Heroku Plugin found my SSH key, because it is in a default location. If it's empty, follow the Heroku guide above to generate a public/private RSA key pair. Then return to the Heroku settings in Eclipse to generate an SSH key.


Create new Heroku app


  • Note: You can import an existing Heroku app by going to File > Import and selecting Heroku.
    However, I will be creating a new app through Heroku.
  • Tell Eclipse to set up a new Heroku project for you by going to File > New > Project...
    and select the Create Heroku App from Template.
  • Select Force.com connected Java app with Spring,OAuth and leave Application Name blank, as this name must be unique across all Heroku apps. If it's blank, Heroku will create a cool name for you.
    • This sends a request to Heroku to set up an app for you and puts all the code in a git repository that Heroku manages.
    • Eclipse will clone this Git repo locally and expose it as an Eclipse project.


Inspect what we have


  • This is a Maven project, so look at pom.xml to see dependencies:
    • Spring
      • spring-context
      • spring-webmvc
      • jstl
      • standard
      • javax.servlet-api
    • Salesforce
      • richsobjects-core
      • richsobjects-api-jersey-client
      • richsobjects-cache-memcached
      • force-oauth
      • force-springsecurity
    • Tomcat
      • webapp-runner
    • Logging
      • jcl-over-slf4j
      • slf4j-simple

There are many code files and settings files in this project, so it's hard to see what's going on. This is different from Force.com applications, in which only code is exposed to the developer, and settings are normally in the environment and changed in the UI. So, instead of looking at each component of this Java application, we are going to look at code at just the highest-level.

  • To see code that calls Force.com, see ContactController.java:
    • Class annotations (@Controller and @RequestMapping) are part of the Spring framework. These
      instruct the framework where to inject framework code at runtime. This keeps code clean.
    • This class uses the RichSobjects library to interact with Sobjects in a Salesforce database
      by using the Partner API.
  • To see the HTML page template we will request, see contacts.jsp:
    • Pretty simple: it's HTML which has JSP tags, which the HTTP request handler will resolve into HTML for the user.
  • To see global variables for the Spring app, see applicationContext.xml:
    • Most values are hard-coded in this file. However, look at lines 29-33 to see yet-unresolved values. These values will be drawn from the Heroku environment, I believe.

      <fss:oauth logout-url="/logout" default-logout-success="/">
          <fss:oauthInfo endpoint="http://login.salesforce.com"
                         oauth-key="#{systemEnvironment['SFDC_OAUTH_CLIENT_ID']}"
                         oauth-secret="#{systemEnvironment['SFDC_OAUTH_CLIENT_SECRET']}"/>
      </fss:oauth>
      
  • Where is Tomcat?
    • Heroku uses idea of an embedded web container. Instead of running a web deamon as an OS process, and the Java app as a separate OS process, we unify the two pieces. We can instantiate the Tomcat web server from our Java program, using a Java wrapper called webapp-runner.
    • webapp-runner makes app deployment and app start very simple.
    • Jetty is another web server that is popular to use as an embedded server.
  • How to start our app?
    • Procfile has a command that Heroku can call to starts an application.
      • web java $JAVA_OPTS -jar target/dependency/webapp-runner.jar --port $PORT target/*.war
      • (process name) (command to execute)
    • Can have multiple processes - e.g. web, worker, and clock
  • Navigate to app on Heroku
    • Find the name of your app, which we allowed Heroku to decide. If it was funny-name-1234,
      navigate to this URL to see that the app is already running on Heroku:
      • funny-name-1234.herokuapp.com

Set up local build for OAuth


This application is currently set up to use OAuth to gain access to data in a Salesforce org. By default, Salesforce will not allow OAuth applications to request access, so we have to add an exception, that is, define an accessible application.

  • To allow an external application to request access to a Salesforce org:
    • Login in to the Salesforce org to which you want to connect.
    • To allow an external application access, go to Setup > Develop > Remote Access.
      • Click New.
      • Choose any name in the Application field for this record. I chose Heroku Local.
      • Choose any email for Contact Email field.
      • Use http://localhost:8080/_auth for the Callback URL field.
      • Click Save.
    • Navigate to the detail view of this Remote Access record to see that Salesforce
      generated a Consumer Key and a Consumer Secret.
  • To set up our project to run locally in Eclipse, instead of only on Heroku:
    • Set up a Run configuration by going to Run > Run Configurations...
    • Select Java Application from the list on the left and click the plus icon at the top of this list.
    • Choose a name for this Run configuration. I chose 'web app runner'.
    • Enter your project name in the Project field, which looks like funny-name-1234.
    • Choose the main class for the Main Class field, which is webapp.runner.launch.Main for this project.
    • Go to the Arguments tab, and enter src/main/webapp in the Program Arguments field.
    • This application uses environment variables for OAuth. We will specify this at run-time by going to the Environment tab. This app is expecting two keys, "SFDC_OAUTH_CLIENT_ID", and "SFDC_OAUTH_CLIENT_SECRET".
      • Click New.
      • Name = SFDC_OAUTH_CLIENT_ID
      • Value = (value of Consumer Key field from Remote Access record we just created)
      • Save this and click New.
      • Name = SFDC_OAUTH_CLIENT_SECRET
      • Value = (value of Consumer Secret field from Remote Access record we just created)
      • Save this.
    • Click Run.


After performing these steps and pressing Run, the application should be running locally on port 8080.
We can see this by navigating to the http://localhost:8080 URL in a web browser. To check that our OAuth has been set up correctly, navigate to http://localhost:8080/sfdc/Contacts URL. The app will redirect to a Salesforce authentication page, where you should click Allow. You will then be redirected back to the same URL in your authentication.


Setup Heroku app for OAuth


We added run-time variables to our environment by adding them to the Run Configuration in Eclipse.
To add these variables to our app when it is running on Heroku, we must add them to another settings
location in Eclipse that gets pushed to Heroku.


  • Add another Remote Access record to the Salesforce org:
    • Login in to the Salesforce org to which you want to connect.
    • To allow an external application access, go to Setup > Develop > Remote Access.
      • Click New.
      • Choose any name in the Application field for this record. I used the name of
        Heroku app, Heroku Funny Name.
      • Choose any email for Contact Email field.
      • Use https://funny-name-1234.herokuapp.com/_auth for the Callback URL field.
      • Click Save.
    • Navigate to the detail view of this Remote Access record to see that Salesforce
      generated a Consumer Key and a Consumer Secret.
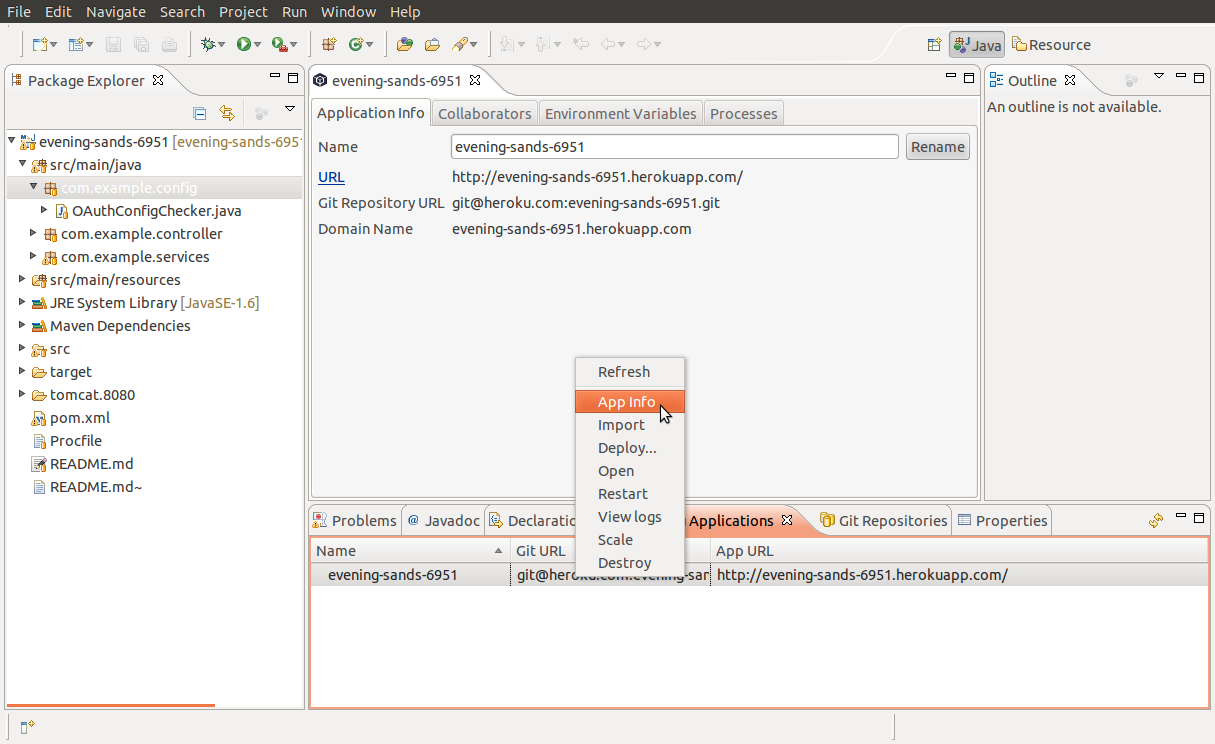
  • Open the Heroku settings for this Heroku project:
    • In Eclipse, click Window > Show View > Other...
    • Choose My Heroku Applications.
    • Right-click on your application in this view, and select App Info.
    • To add new environment variables to this Heroku app, choose the Environment Variables tab
      from this file.
      • Click the + button on the right.
      • Key = SFDC_OAUTH_CLIENT_ID
      • Value = (value of Consumer Key field from Remote Access record we just created)
      • Save this and click New.
      • Key = SFDC_OAUTH_CLIENT_SECRET
      • Value = (value of Consumer Secret field from Remote Access record we just created)
    • After adding these environment variables, the Heroku app should be immediately updated to
      reflect the values. If you navigate to the Contacts URL of your Heroku app,
      funny-name-1234.herokuapp.com/sfdc/Contacts, you can see that the OAuth is now working.

Add New Feature to Your App


To show how to add a new feature to the app, we will be adding a link to each contact's Twitter
handle. Follow these steps to add this new feature.


  • 1) Add a new custom field to the Contact object:
    • Login to the same Salesforce org.
    • Go to Setup > Customize > Contacts > Fields. Click New and create a new text field
      called TwitterHandle__c.
    • Save this.
  • 2) Query this field in our local copy of the Java project:
    • In Eclipse, open ContactsController.java.
    • In the listContacts method, add TwitterHandle__c to the Select clause of the query.
    • Save this file.
  • 3) Expose this field value in the JSP page:
    • In Eclipse, open contacts.jsp.
    • Add a new header column to this table by adding <th>Twitter Handle</th> to line 13,
      underneath the Email header.
    • Expose the field value in the table cells by adding <td>${contact.getField("TwitterHandle__c").value}</td>
      to line 27, underneath the similar row for Email.
    • Save this file.
  • 4) Test this change in the local build of the project:
    • Stop the server by opening the Console view in Eclipse and clicking the red stop button.
    • Run a new build, which will have our Twitter handle column in the Contacts page by clicking
      the Run button underneath the toolbar, which looks like a green arrow.
    • Navigate to the URL for this local page, which should be http://localhost:8080/sfdc/contacts.
  • 5) To commit these changes locally:
    • Right-click on your project in the Package Explorer in Eclipse, select Team > Commit.
    • Add a commit message which describes the changes, and click Commit.
  • 6) To push these local changes to our Heroku repository:
    • Right-click on your project in the Package Explorer in Eclipse, select Team > Push to Upstream.

Managing Your App


  • Check status of app
    • Go to My Heroku Applications view in Eclipse.
    • Right-click on one of your apps, and click View Logs to see last 1500 log lines
      for your app in production.
    • Heroku made a thing called "Logplex". All messages that your app produces can
      be accessed here. You can find third-party apps to derive information from these logs.
  • Scale your app up and down
    • Free dev accounts have only one dyno.
    • To scale app to >1 dynos, must tie money to account, for example, by joining
      app to Heroku org with money.
    • Right-click on one of your apps in My Heroku Applications, click Scale and choose 3.
      Your app is now on a 3-node, load-balanced cluster.
  • Add collaborators
    • Go to My Heroku Applications in Eclipse and click App Info.
    • Go to the Collaborators tab to see all other users in your Heroku organization.
    • Either select one of these users or click the plus button on the right to add by email.


Starting to Understand Inheritance

Saturday, May 19, 2012

Software Inheritance

As a software engineer, as you spend more time in the profession, you will continually see software structured differently from how you would do it. Sometimes, you are just confused by the author's code, other times you understand and disagree with it, and yet other times you become so inspired by it that adopt its design. Recently, I've come across object-oriented code that makes heavy use of inheritance in its solution, and I have been actively confused by it due to its difficult reading level. I think I am finally coming to understand how to read code written in the inheritance style, and I'd like to share what I've found.

Initial Issues - Internal State

When first encountering inheritance, I interpreted it on a shallow level. I saw the 'extends' keyword, which means it 'inherits' from the specified class and can reference its variables and methods, but I never understood how its utilization could justify the higher maintenance cost of its slurred readability.

The first issue I had with reading inheritance-based code is sharing class properties. When I create a new class, I design it to minimize references to internal state. I use static methods as much as possible. Why? Those class properties are variables, unless they use 'final' keyword, and without foresight for possible values of these class properties, your methods can produce unexpected results.

So consider my surprise to see references to a base class' internal properties from an inheriting class! What could the author be thinking? Are you really sure you trust that that class-external variable will always be a valid value for your class? Holy buckets, Batman, this inheritance business seems to be a bucket of holes!

Towards Better Understanding

I was reading some Javascript code recently for an Ajax-y framework. The base of the app uses John Resig's simple Javascript inheritance, and subsequent objects extend from this base Class type. It seemed that the author was so influenced by inheritance that he wanted to force it into Javascript before considering his solution. I understood inheritance on a shallow level, but still - what is so necessary about inheritance?

After some research, I think I'm starting to understand the case for inheritance. The explanation offered on this Wikipedia page on Differential Inheritance was quite inspirational.
"To think of differential inheritance, you think in terms of what is different. So for instance, when trying to describe to someone how Dumbo looks, you could tell them in terms of elephants: Think of an elephant. Now Dumbo is a lot shorter, has big ears, no tusks, a little pink bow and can fly. Using this method, you don't need to go on and on about what makes up an elephant, you only need to describe the differences; anything not explicitly different can be safely assumed to be the same." - Wikipedia: Differential Inheritance
Ah, from this point of view, inheritance is a convenient way of saying "I need a class just like that one, but a little different." In other words, it is a programmer's feature for convenient customization. A bonus feature is that the inheriting class can be used in place of the base class by using type casting. (Short thought - isn't this ability better performed by using interfaces and a platform that accepting registering custom handlers?)

Issue Still Remains

While I do have a better understanding of inheritance now, my problem still exists: If MyClass inherits from BaseClass, I can't look at MyClass on its own because most of the real logic exists in BaseClass! This doesn't help when debugging these two classes, since BaseClass was designed to run one way, and MyClass might be changing the behavior of BaseClass in an incompatible manner. Sure, this may work, but it feels a bit fragile and unnecessary. I wonder if my understanding of the benefits of inheritance-utilizing code will grow as I continue to read it, but I hope it isn't a poison that infects my style.

On Moving to Legacy Java Web App Maintenance

Thursday, March 1, 2012

I work in a company with other developers. Whether we are on the same project or not, we are on the same team and we need to support each other. Since I started working at Sundog ~14 months ago, I've working solely with Salesforce, doing custom Force.com development. I've gotten pretty accustomed to the limits and boundaries of the platform, and I feel that I'm pretty good with it.

A coworker has been maintaining a rather large legacy Java web application by himself for the last >2 years. It's been decided that its time to shift another developer into his position, and that person shall be me. He was getting pretty sick of being the lone developer on old code. As he has been setting up my environment and training me in over the last week, I can almost see the weights as they are lowered from his shoulders. He's a great software engineer who has been trapped by misfortune for a long time, so I'm happy to step in so he can move onto something else.

As a company, we have been pretty poor about shifting teams. Some people grew so tired of being the only person who can something, and they have left the company because of it. These employees are called knowledge silos, and this is inherently a bad thing. If only one employee knows how to manage an important system, or only one employee can use a certain software tool, the company will be screwed when that employee leaves. It would take months before they can find another person with a similar skill-set, and even longer for that person to catch up to where his predecessor left off.

So yes, I'll be using Java, and re-learning how to program since I haven't used it in a long time. I've learned how to set up a local web application server, OC4J, and how painful they are to boot, configure, and manage. I've learned how to set up and use a 'real, enterprise' IDE, IntelliJ, to edit, deploy, and debug Java projects. I still need to learn a whole new set of keyboard shortcuts and IDE quirks. I will continue to learn about OS-level frameworks, specifically, Struts and Spring, and their models of handling HTTP requests. I will study up on OOP design patterns, and I will have to review the advanced language features that are available to use in Java (I'm familiar with Salesforce's Apex, which is Java Lite).

I have mixed feelings about this change in positions for me. I am happy to learn about different MVC frameworks and how a real debugger works (I haven't hardcore used one before). However, I am truly worried that I will be doing Java maintenance for the foreseeable future (RE: >1 year). I really don't want to be off by myself again, separated from the forward direction that the company is taking into cloud and mobile platforms. I am really worried that doing pure maintenance like this for a full year will destroy my passion and motivation for software engineering, design, and language theory. Here's to hoping I can keep my chin up. ( ̄ω ̄')

How to Implement my Theoretical UpdateContentRequest

Friday, February 10, 2012

Continuation from previous post. It was written on a caffeine high, so I thought I was saving the world, and this post would be the roadmap to salvation.

Alright, problem: the user clicked the "next" button/link, now our Javascript app needs to load new content.
Link the button to a Javascript function called UpdateContentRequest. What does this function do? We want this function to do everything necessary to update the page to show this new content. This requires a few steps.
First, it has to request the new content from the server. This isn't too difficult if we use jQuery's snack function. A more flexible solution is to make the content available via a REST interface and use a Javascript REST framework. What do we do after we get it? We can either store it locally, either in a variable or in the HTML5 LocalStore. The other option is to immediately render it to the page without storing it long-term.

This brings us to the next step. Once we have the data, how do we render it to the page easily and appropriately? This also shouldn't be too difficult if we use the right tools. It's easy to know where to place this new data using Javascript if we use an id attribute to mark the parent element of the content - call it "blogContentWrapper" or something. The other tool to use is a Javascript templating language. There are many of these out there, such as jQuery templates, handlebars, or mustache, so just pick your favorite. These tools allow you to write an HTML template with a few holes, then inject data into this template to dynamically produce the marked-up content. Just take this marked-up content and replace the current child of the "blogContentWrapper" with it.

Wow, this sounds so easy. The hard part is to make this library flexible so it can be used for a number of types of websites while keeping it easy to use and powerful. I'll need to consider the use cases for this library and then reconsider the level of abstraction to use. Also, Google supports crawling Ajax websites like this, so I'll need to consider their requirements to keep this library compatible.

The Appeal of Single Page Web Apps

Single page web apps. I am very happy when I visit a site that subscribes to this philosophy because they at very responsive. A philosophy? Yes, I think it is a philosophy. Can we call it a philosophy if its followers advocate it as a way to avoid wastefulness? While single page web sites are a wonderful solution when creating a few types of web sites, it isn't the best choice for others types. Ignore that while we discuss the wastefulness that single page web sites solve.

Website wastefulness? What waste, exactly? What I am thinking about is the site's entire HTML markup, Javascript, and CSS styling must be resent to the browser for each request. Sure, client-side browser caching may help reduce the wasteful resource requests here, but we shouldn't depend on the client to optimize this when the website developer has the power to optimize the user's experience.

How can the website developer optimize this? Make the web site a Javascript app! Send this Javascript app on the initial page load, then delegate each subsequent page request to the Javascript app. How will the Javascript app do this? It will request just the new content from the server and place it on the page. Using this method, we are only grabbing the new content that the user wants, not all the resources and markup for the page. Efficient! And fast!

I haven't figured out how to architect this Javascript framework, but I'm sure it would be worth the time investment. Maybe there is an existing framework that does most of this, or even some of it.

Alex Reads - MS Research - Cohesive and Isolated Development with Branches

Saturday, January 14, 2012

Post-read thoughts -
   This paper seems like it was written by amateurs. Note that I am not a member of the academic community, nor do I write academic papers, so this is more of a comment on their writing style and their ability to defeat my BS filter (i.e. Can you prove that? How exactly do you define 'x'?).
   Having said that, there are some useful ideas and interesting results from their interviews and research with real projects. Here's what I found interesting:
  • Studies show that branch usage greatly increases with new adoptees of DVC.
    • Pre-DVC, 1.54 branches/month. With-DVC, 3.67 branches/month (though I worry about methods used to obtain this info)
    • The idea that prior to DVC, branches were created only for releases, not new features.
    • To effectively use DVC branches, create one for each new feature, localized bug fix, or maintenance effort.
  • Studies show that even with DVC, a central repo is still used. (It is important to admit this, IMO)
    • An accessible DVC repo enables anyone to contribute to the project. Developers without commit privileges were reduced to working w/o VC. Accepting changes from unofficial project members has high barriers.
    • Academics advise us to checkpoint code at frequent intervals in a place separate from the 'team repo'. Only tested and stable code should be integrated into the 'team repo'. DVC systems enable and encourage this practice.
  • The term "Semantic conflict" - All VC systems are good at syntactic conflicts, but not semantic conflicts.
  • Awareness of  'Distract commits', which are commits that are required to resolve merge conflicts.


Link to Microsoft Research paper -
Introduction web page - http://research.microsoft.com/apps/pubs/default.aspx?id=157290
Research paper [PDF] - http://research.microsoft.com/pubs/157290/paper.pdf


Abstract. The adoption of distributed version control (DVC), such as Git and
Mercurial, in open-source software (OSS) projects has been explosive. Why is
this and how are projects using DVC? This new generation of version control supports two important new features: distributed repositories, and history-preserving
branching and merging where branching is easier, faster, and more accurately
recorded. We observe that the vast majority of projects using DVC continue to
use a centralized model of code sharing, while using branching much more extensively than when using CVC. In this study, we examine how branches are
used by over sixty projects adopting DVC in an effort to understand and evaluate
how branches are used and what benefits they provide. Through interviews with
lead developers in OSS projects and a quantitative analysis of mined data from
development histories, we find that projects that have made the transition are
using observable branches more heavily to enable natural collaborative processes:
history-preserving branching allow developers to collaborate on tasks in highly
cohesive branches, while enjoying reduced interference from developers working
on other tasks, even if those tasks are strongly coupled to theirs


Introduction
  1. Purpose of Version Control
    1. Create isolated workspace from a particular state of the source code.
    2. Can work within one branch without impacting other developers
  2. Purpose of branches
    1. Should be 'cohesive' so that a team can work together on a branch
    2. Keeps new features separate, and allows merging features when complete
  3. Evolution of VC systems
    1. Marked by 'increasing fidelity of the histories they record'
    2. 1st gen - record individual file changes - can roll back individual files (RCS)
    3. 2nd gen - record sets of file changes (transactions) that can be rolled back (CVS)
    4. 3rd gen - records history of files even through branching and merging (DVC)
  4. DVS features
    1. Every copy of a project is a complete repository, complete with history
    2. Can change source code changes with other peer repositories
    3. Preserves history through branches and merges
      1. Each child commit tracks its parent commits - across branches and merges
      2. Allows us to quantitatively study of branch cohesion and isolation
      3. Allows us to study relationship in branch usage with defect rates and schedules delays
  5. Why has DVC become so popular?
    1. Developers wanted to use branches, but experienced "merge pain" with CVS
      1. Studies show that branch usage greatly increases with new adoptees of DVC
      2. Studies show that even with DVC, a central repo is still used
      3. Can observe that branched history can be linearized into a single 'mainline' branch
  6. RQ2 is "How cohesive are branches?"
    1. 'Cohesivity' is measured by directory distance of files modified in a branch (wha?)
    2. Compare branch cohesion in Linux history against trunk branch cohesion
    3. If branches are not more cohesive, then either a) trunk is more cohesive or b) directory distance is not a good measurement for 'cohesivity' (lol)
    4. Results - branches are far more cohesive than background commit sequences (background?)
  7. RQ3 is "How successfully do DVC branches isolate developers?"
    1. VC is good about flagging syntactic changes between branch-time and merge-time
    2. VC is not good about flagging semantic changes between branch-time and merge-time
      1. Semantic = assumptions made during development (so, API/method changes?)
      2. Branch coupling causes semantic conflict
    3. Semantic conflict is number of files in branch that was also modified in trunk since fork
    4. Measure how often a semantic conflict would interrupt a developer if using no branching
  8. Paper proves three things
    1. Prove that branching, not distribution, has driven popularity in DVC
    2. Define two new measures, branch cohesion and distracted commits
      1. 'Distract commit' are new commits required to resolve merge conflicts
    3. Show that branches are used to undertake cohesive development tasks
    4. Show that branches effectively protect developers from concurrent development interruptions
Theory
  1. History
    1. Git and Mercurial basic history - birth, growth, majority use in Debian
    2. Adopting new VC is very difficult - citing experiences by Gnome, KDE, and Python
  2. RQ1 "Why did projects rapidly adopt DVC?"
    1. Interviews show that main reason is to use branches for better cohesion and isolation
    2. Exactly how cohesive are branches? How well do they isolate feature teams?
    3. If developers use branches to isolate tasks, branches will be cohesive. On the other hand, developers could use branches merely to isolate personal development work, without separating work into tasks
  3. RQ2 "How cohesive are branches?"
    1. Coupling and Interruption
      1. Should checkpoint code at frequent intervals separate from 'team repo' - only tested and stable code should be integrated into 'team repo'
      2. When ready, integration must not be difficult or gains of personal branch is lost
      3. When not using branches, changes are not proven stable, require integration work
      4. Studies show that resuming from interruption takes at least 15 minutes
  4. RQ3 "To what extent do branches protect developers from integration interruptions caused by concurrent work in other branches?"

Methodology
  1. Began with interviews to developer hypothesis regarding motivations for adoption
  2. Empirically evaluating by performing statistical analysis
  3. Semi-structured interviews (sounds like high probability for introduction of non-scientific bias)

Evaluation
  1. Description of linearizing a branched DVC history
    1. Project concurrent sequence of changes onto single timeline
    2. Commits on this timeline represent changes 'across' branches
  2. Rapid DVC adoption
    1. Observe that, contrary to common knowledge, most DVC projects do not make use of distribution
      1. Of 60 projects, all but Linux use centralized model around single public repo
        1. (this doesn't make sense. I think their understanding of 'distributed' is off)
    2. Some branches that grew too different from trunk had to be abandoned
    3. Prior to DVC, branches were created only for releases, not new features
    4. Pre-DVC, 1.54 branches/month. With-DVC, 3.67 branches/month
    5. Developers without commit privileges were reduced to working w/o VC
      1. Accepting changes from unknown devs required huge patch sets
        1. Could not add incremental work
        2. Sometimes included unrelated changes
    6. Therefore, main motivation is branching, not distribution (define "distribution"?)
  3. Cohesion
    1. Large systems structure their files in a modular manner - related files are located nearby (I question this premise)
    2. [Science! Graphs are shown, descriptions and explanations are given]
    3. Results show that branches are relatively cohesive.
      1. Interviews are consistent - branches are created for more than releases (low standard)
      2. DVC branches comprise features, localized bug fixes, and maintenance efforts
      3. Three interviewees indicate that non-trivial changes would have been created offline and then commited in a single mega-commit
  4. Coupling and Interruptions
    1. [Hardcore science! Too difficult to understand. Questionably scientific pictures]
      1. Trying to identify and quantify 'semantic conflicts'
    2. Some disclaimer that git allows 'hidden' history in unpublished commits, hidden by rebasing

Related Work
  1. This paper's main concern is to study history-preserving branching and merging
    1. Some people advocate even finer grained history retention
    2. Some people advocate automating information acquisition, such as static relationships
  2. Some people recommend patterns to use for workflows that effectively use branching
    1. Other people advocate workflows that mitigate branching/merging issues
  3. Somebody proposes current tools and project management is inadequate

Bit of MVC History and Thoughts on the Proliferation of Competing MVC Flavors

Monday, January 2, 2012

While I've been exploring various implementations of presentation patterns/frameworks in Javascript, I've started questioning the MVC (Model-View-Controller) pattern as a whole. What problems does it solve? How is it different competing presentation pattern ideas, such as MVP and MVVM? I'll use this blog post as a way to organize my findings and thoughts. I'll give a bit of history first, then give a bit of speculation at the end.

MVC is an architectural pattern, the purpose of which is mainly code organization and separation of concerns. It was conceived a long time ago (1979) by Trygve Reenskaug. He was a member of the Smalltalk community in the early days of GUI design, and took part in the early conversations of various patterns for organizing code when creating solutions for handling user input in a GUI context. He authored his first paper on MVC, titled THING-MODEL-VIEW-EDITOR, which details one such pattern. The community later distilled these terms, explained here, to become model, view, and controller, as defined in this revised paper.

It is important to note, however, that this architectural pattern was conceived before complex internet pages and internet applications were possible. Rather, this first conception of MVC was a GUI solution within the problem domain of desktop applications. I believe this style of MVC, which uses multiple layered views, is used on OS-level platforms, such as and now seems incongruent as a pattern for web app servers and page generation. Internet pages and internet applications have a much different set of limitations than desktop programs - the most notable of which include the stateless nature of HTTP and the added cost of sending data back and forth across the wire between the client and the server.

Because of the popularity of the MVC pattern, it was used as the pattern for delivering web pages in the internet age. Because of the differences in the problem domain, however, the pattern evolved to fit the new problem domain. It is possible that this general incompatibility was one of the central reasons for the many MVC spin-offs that have been conceived since then, though it is just pure speculation. An equally qualified reason would be that people started using MVC without fulling understanding the reasons behind the existing MVC, or without knowing that an existing MVC existed.

I wonder about the reader's thoughts. Do you think the reason for the proliferation of varying ideas of MVC is that the domain changed to the web? Or is it because people started using it while having a poor understanding of its reasoning and concepts? Is this a waste of the brain's processing time? Maybe, but I enjoy it.

Backbone Requires a Main View for the App?

Tuesday, December 27, 2011

Here's a continuation of time spent considering my previous problem: Backbone.js and its view-centric MVC architecture.

Would we really want a model to be able to render itself to the page? Considering the information it has, I don't think we want it to. First of all, how does it know where in the DOM to draw itself? I suppose we could give it a specific DOM element as an attribute when create the model, then it would know where to draw itself. But, what if this model is in a collection, such as a list? How does it know where in the list to render? We could probably wrestle through this problem, but the code would get mangled somewhat, and each model instance would get pretty heavy.

It seems, then, that this task of rendering a model is best performed by either the model's collection or its view. In other MVC frameworks, a 'controller' is used to place the model's information in the view's DOM. In backbone, this is the responsibility of the 'View' object. Why is it called View instead of Controller? I believe it was named this way because it is meant to 'resolve to' HTML code. Not a name that suits the MVC style, but I can see the logic.

A Backbone app, then, requires a main view (controller) that spawns views and models, using these views and models purely for code organization's sake, delegating to them solely the task of data integrity. I started hacking at my backbone app thinking that the main view's (controller's) job is just to initialize everything, but this is not the case. Instead, it is in charge of creating and destroying the various Views and Models in your app and associating models with views.
(Still not sure of the recommended relationships between views and models. I'll have to keep reading stackoverflow's backbone tag responses to learn more.)

I'm starting to think that this framework is overkill for what I'm trying to do. Something like knockout.js seems like a smarter choice. I've heard the developer say that it is great for creating "JSON editors". That is, request JSON from the server, then bind its attributes to fields for easy editing. That is also on my list of libraries to try.

What SHOULD MVC be for Javascript? Towards other JS MVC ideas.

Saturday, December 24, 2011

With all the trouble I've been having with Backbone.js lately, I've decided to take a step back and look at my attempts from a higher level. Using a framework shouldn't be this difficult! Why, then, am I having so much difficulty? I've decided that it is because my idea of "Javascript's version of MVC" is misbased. Therefore, I've decided to start looking at the whole spectrum of Javascript frameworks - Backbone, Spine, Knockout, and JavascriptMVC (did I miss any other major ones?).

Addy Osmani (not quite sure why he's famous, but he's skilled at explaining these frameworks from a high-level) recommends JavascriptMVC, because it is the "most comprehensive" and mature framework at the moment. I hope the community is friendly, because I've decided to choose this as the next stepping stone in my Javascript MVC studies. I hope the people that created it were educated enough to use intuitive object names and abstractions, as I'll need them to improve my understanding.

When reading this introduction to JavascriptMVC, I've been inspired to return to the idea of an application's "state" once again. The author asserts that "The secret to building large apps is NEVER build large apps. Break up your applications into small pieces. Then, assemble those testable, bite-sized pieces into your big application." A agree completely with this! But, how can one make bite-sized Javascript pieces? Inevitably, these pieces must talk to each other, so how can we do this?

How about this idea for communicating between modules: Use the page's state variables to communicate between these pieces in a pub-sub manner. This manner is very much like how disparate computer systems communicate across the internet. The internet is probably the most modular system I am aware of, and if modularity is what you want, then using the internet's model is probably best.

So, the page's state. Would having a set of variables on your web page limit the scalability of your site? As long as you aren't transferring the state back to the server, you should be fine. As long as the web app talks back to your servers through a stateless API, you should be fine.

Great, so I can't think of any reason why we can't have a few state variables on our client-side page, so I'll try to use the state to facilitate communication between Javascript components. (If it is easy to do with JavascriptMVC that is.)

Backbone's Perverted Architecture and MVC

Sunday, December 18, 2011

I'm still working on getting my Backbone.js project to work. So far, I've got a text box and a list that would update itself. Not too impressive. Why am I not successful? Three reasons: (1) I've never worked in Javascript before, (2) I haven't used this framework before, and (3) I haven't used this perverted style of MVC development before.

Perverted style of MVC? Yes, Backbone doesn't tell you how to use its objects, it feels like it is saying
"Here's 3-4 Javascript objects that we like. They work great together! They have built-in behavior, which makes it awesome! However, there's a lot that ISN'T built-in, and we leave that to you to figure out. But this is what makes Backbone flexible! Great, isn't it?"

Some questions I find myself asking: How should I structure my JS app? View-centric, model-centric, or collection-centric? I would like to just manage the Javascript side of the app - just worrying about the collections or models. If I add a new model to a collection, it should automatically render the change collection to the page. I have found no examples for a model-centric app like this. I find myself with a machete in a jungle, hacking my through the objects and their relationships, trying to find the path that the Backbone designer has left for me to find.

Looking through the Stackoverflow questions and answers, it seems that it is possible to create view-only apps with Backbone. This confirms my suspicion that I've been using Backbone in a backwards way, trying to create my models first. One thing I learned today is that the idea of a Backbone View is that it 'resolves' to an HTML tree that can be applied to the page's DOM. That is, your master 'AppView' is meant to create sub-views, then  request their HTML rendering to apply onto the page. Frick! This makes no sense! So the view can't actually render itself on the page? It requires a parent view to place it in the correct place? No! Maybe if I understood the capabilities of Javascript a bit better, I could make Backbone do it this way, but I was not successful.

Next time I try to fix this app, I'll take the view-centric approach. I'll have my master AppView spawn child views, then pass them a model to hold its data. It's a very silly way of approaching the problem, but I'll do it. I'll do it just to see if backbone actually works with Visualforce. Then, I'll look into optimizing the architecture, unless I move onto a better JS MVC framework.

Since I've been taking this 'backwards' model-centric approach, I'll change gears when I stab at this project next. That will work, for sure. Then, I'll try using Spine.js, which looks like it has a much more sane architecture. Also, Spine is appealing because client interactions are completely decoupled from the server, which sounds like the ideal remedy for the slow response times between Visualforce pages and their Salesforce servers.

Initial Backbone.js on Force.com Issues

Thursday, December 15, 2011

I spent a fair amount of time the last day or two working on creating a Visualforce page that uses backbone.js as an intermediary for communicating with the Apex controller via Ajax calls. I am still doubtful whether this framework will prove to be a good way to interface with Salesforce objects and data, but I won't know until I finish.

Now, much of the time I've spent so far has been to connect the several backbone.js objects. They are: the model, the view, the controller, the HTML templates, and their duties to one another.

While backbone.js is a framework that follows the MVC pattern, backbone's view serves a different purpose than the view in other frameworks, such as Salesforce's own MVC framework of Visualforce and Apex. The purpose of Backbone's view is to bind to an HTML element, and, when appropriate, render data from the model into this element using an HTML template.

Did you also notice the interesting bit here? There are actually two views in play here! The HTML is the true (or truer) view, while the backbone.js view supplies the HTML view with logic, acting almost like a controller.
So if the view is a controller in backbone.js, then what is the controller? Well, in backbone.js, the C represents collection, which is a "smart list" that holds backbone models. Likewise, backbone models are simply Javascript objects, nothing more!

Well, that's a slight simplification, since each of these backbone objects has a bit more responsibility than I explained above. I'll explain the jobs/responsibilities of each of these backbone.js objects in my next post. For now, I want to discuss a few of the issues I've encountered.

The first problem I was having was with jQuery. It is usually necessary to use jQuery in no-conflict mode, and to alias it to a variable that is not '$', such as '$j'. Having said that, Backbone has two other Javascript libraries as dependencies, Underscore.js and jQuery, and uses them extensively under the covers. I had some problems with using no-conflict mode here, but this was solved with a few well-known tricks. Here is one way to solve the problem. This great blog post has some other solutions.

j$ = jQuery.noConflict();
j$(document).ready(function($){ /* All Backbone code goes here, called after onReady is fired. */ });


The other problem is that Backbone.js is built to use a RESTful way of GETting data from and POSTing data to the server. So naturally, I started writing a @RestResource class that will respond to these calls to retrieve data and update data in the database. This is one place I started to encounter problems - these REST handlers are located at na4.salesforce.com/services/apexrest/, which is a cross-site-request from the Visualforce page at c.na4.visual.force.com/apex/. Still not positive this is the problem, but I'm pretty sure. To resolve this, I will attempt to handle Backbone's sync calls with Javascript Remoting.

Backbone.js and AUI on Force.com - Good Idea?

Web development is an art. It is easy to make a web page, but very difficult to make a beautiful one. It is easy to make a static page, but very difficult to make a dynamic one. It is easy to make a site with multiple pages, but very difficult to make the content intuitive and interesting to navigate. A page I make may be perfect, but a friend may look at it and dislike it, or more ideally, be able to offer constructive criticisms about it.

Because web development it is such an art form, it matures over the years. In the early days, there were single page sites. Then came multiple page sites, followed by interactive/dynamic sites, and as they matured and became more user- and data-centric, became full-fledged web apps. All these changes were enabled by a maturing culture among web developers, new technology and languages, and a shifting market for consumers of the web sites and web applications.

Some web apps are data-centric, such as most apps on the platform with which I work, Force.com. What I dislike about the platform, however, is the length of time it takes for requests to return from the server and for the page to refresh. When I came across the idea of the Asynchronous User Interfaces for web sites, I fell in love with the idea. This is how a web site UI *should* feel. It feels fast like a native application while still allowing me to dynamically manipulate and synchronize data with the backend.

So why, then, are more people not making AUI web sites? I can understand if it was much more difficult, but with the right abstractions, it seems to be not too difficult at all. Choosing a simple library, such as backbone.js, spine.js, or knockout.js can make development on one of these one-page-sites much easier.

I want to give a high-level overview about how a tool like backbone.js could be used on top of the Force.com platform. Let's take a look at the building blocks we have. Force.com is the server-side database. The methods on the Apex controller is the intermediary between the client-side web page and the database. Then we have the client-side web page, which is HTML/CSS for the display and Javascript for the client-side logic.

What I want is an HTML table that is a view into a Javascript object collection. When I modify elements of the HTML table, I want the modifications to be directly modifying the Javascript object collection that is bound to it. Then, I want it to save to the Force.com database, either at random, appropriate times, or on-demand by clicking a save button. Let's see if we can make this happen.

I've have just a little experience with Javascript and web development, so I'm not sure if this is possible or a good idea, or even if it will be better than what exists. I'll find out soon enough.

The Base of Maintainable Programming Languages - Libraries over Syntax?

Tuesday, December 6, 2011

I often wonder about what language is "the best". It's fun to think about these things theoretically.

I believe that there are two relevant ways of expressing meaning in a language: syntax, idioms, and libraries. Syntax is direct meaning and the compiler won't let you write bad syntax. Idioms are common ways of using language features to solve common problems. Libraries solve big problems that requires lots of code, and abstract it into a simple interface, a new syntax.

Discussing just the library side of languages -
If a language has very powerful standard syntax, newbies will try to solve all of a language's problems with the language's standard syntactic tools. If a languages has fewer syntactic tools, then the newbie will be forced to either write lots of code to solve simple problems, or to dig into the language's community and common libraries to solve problems.

I argue that it is theoretically better to have a language with less complex syntax and a stronger community-maintained set of libraries that solve common problems. Such as Lisp/Clojure, where the language's entire functionality is constituted of its libraries. This way, if you attempt to solve a problem, you are reinventing very little, but rather, you are subscribing to an existing solution to the problem.

When others come to look at your code later on, they can see what solution you chose to subscribe to. Even better, your solution/library has a name attached to it, and that name can be Googled to find much more information about that solution on that library's website or IRC channel.